Tag Archive | Reach for the Stars

And… the holidays are here…

This year is flying by!  Much too fast for my taste at the moment.  Especially when I can actually sense when my kids have “grown up” a little since last week.

Lots since the last post, just not a lot of time to sit and type up a blog entry.  I appreciate that you stopped by – hopefully you will see something that interested you.

Since the last post, many things have gone on around here.  Long post with the pictures, but since I’m down to a single post per month – maybe you can persist with me?

My company moved their office to a completely new building – all new construction and only one other company that moved in the same weekend as we did with three other floors vacant.

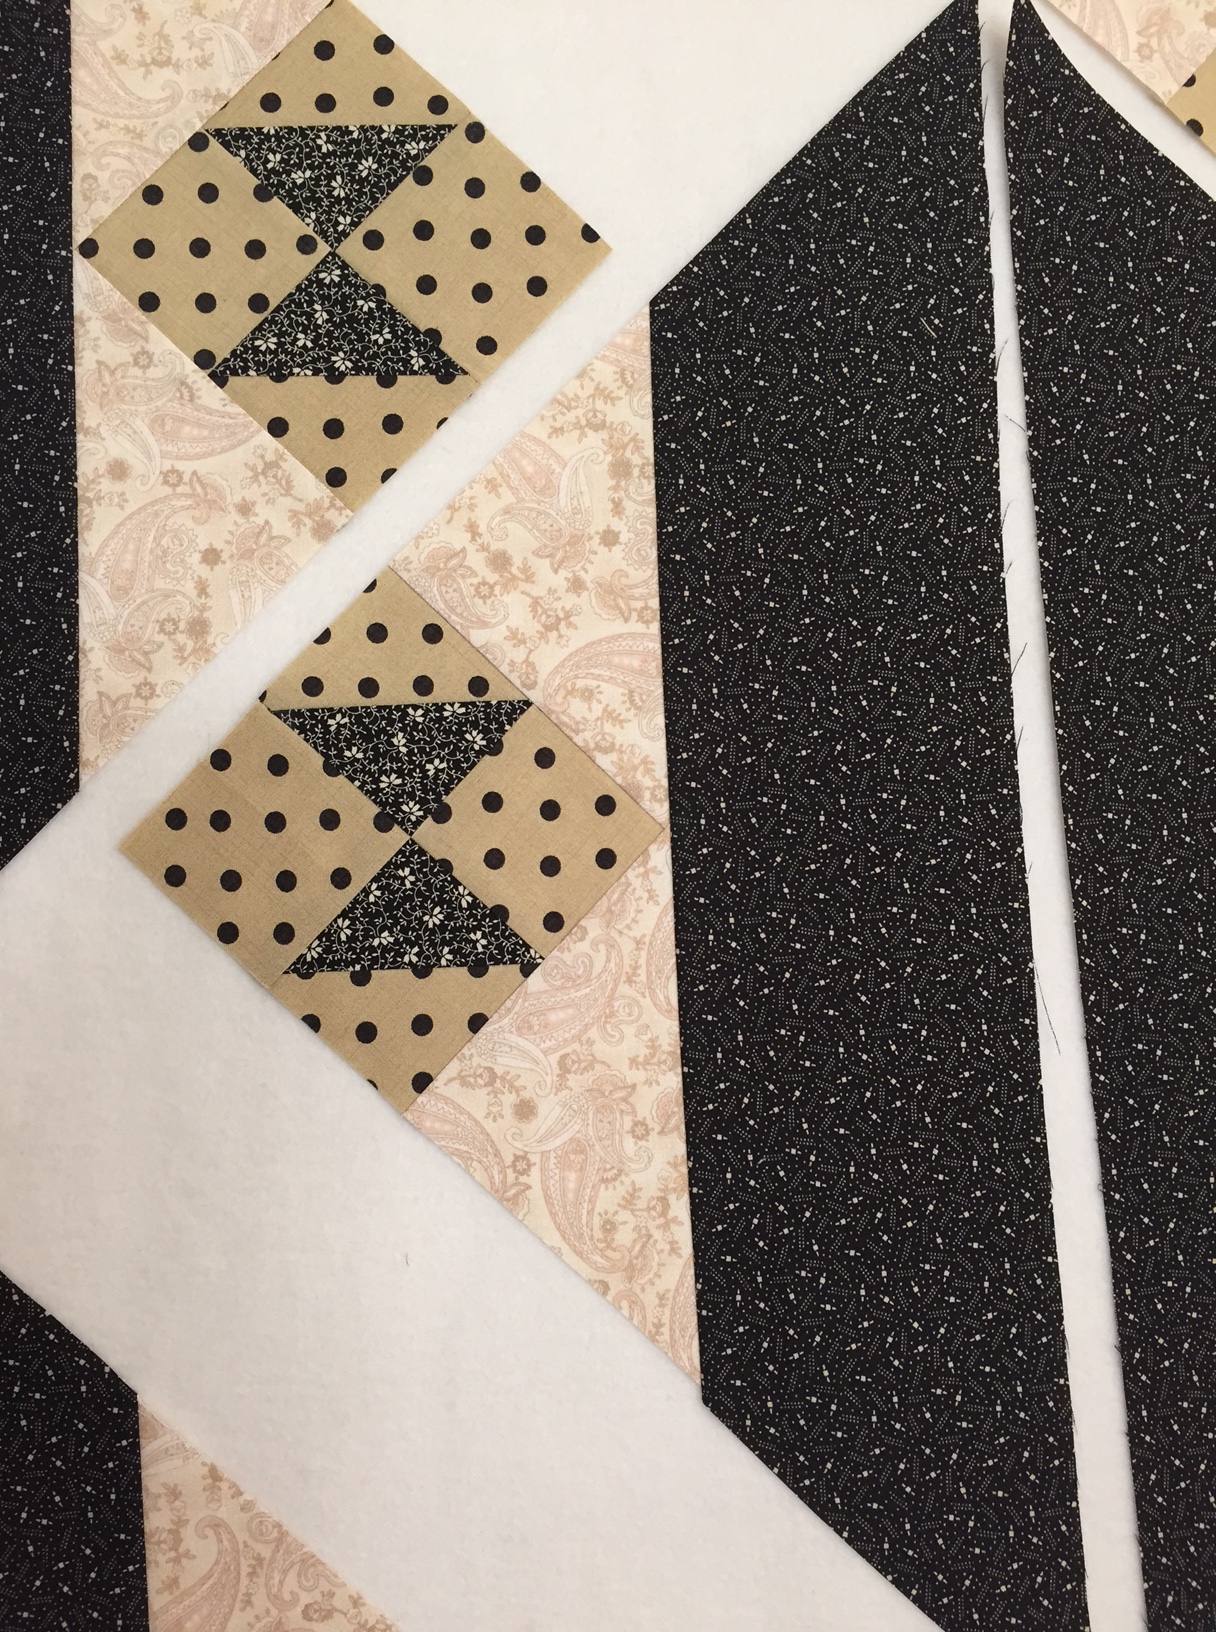
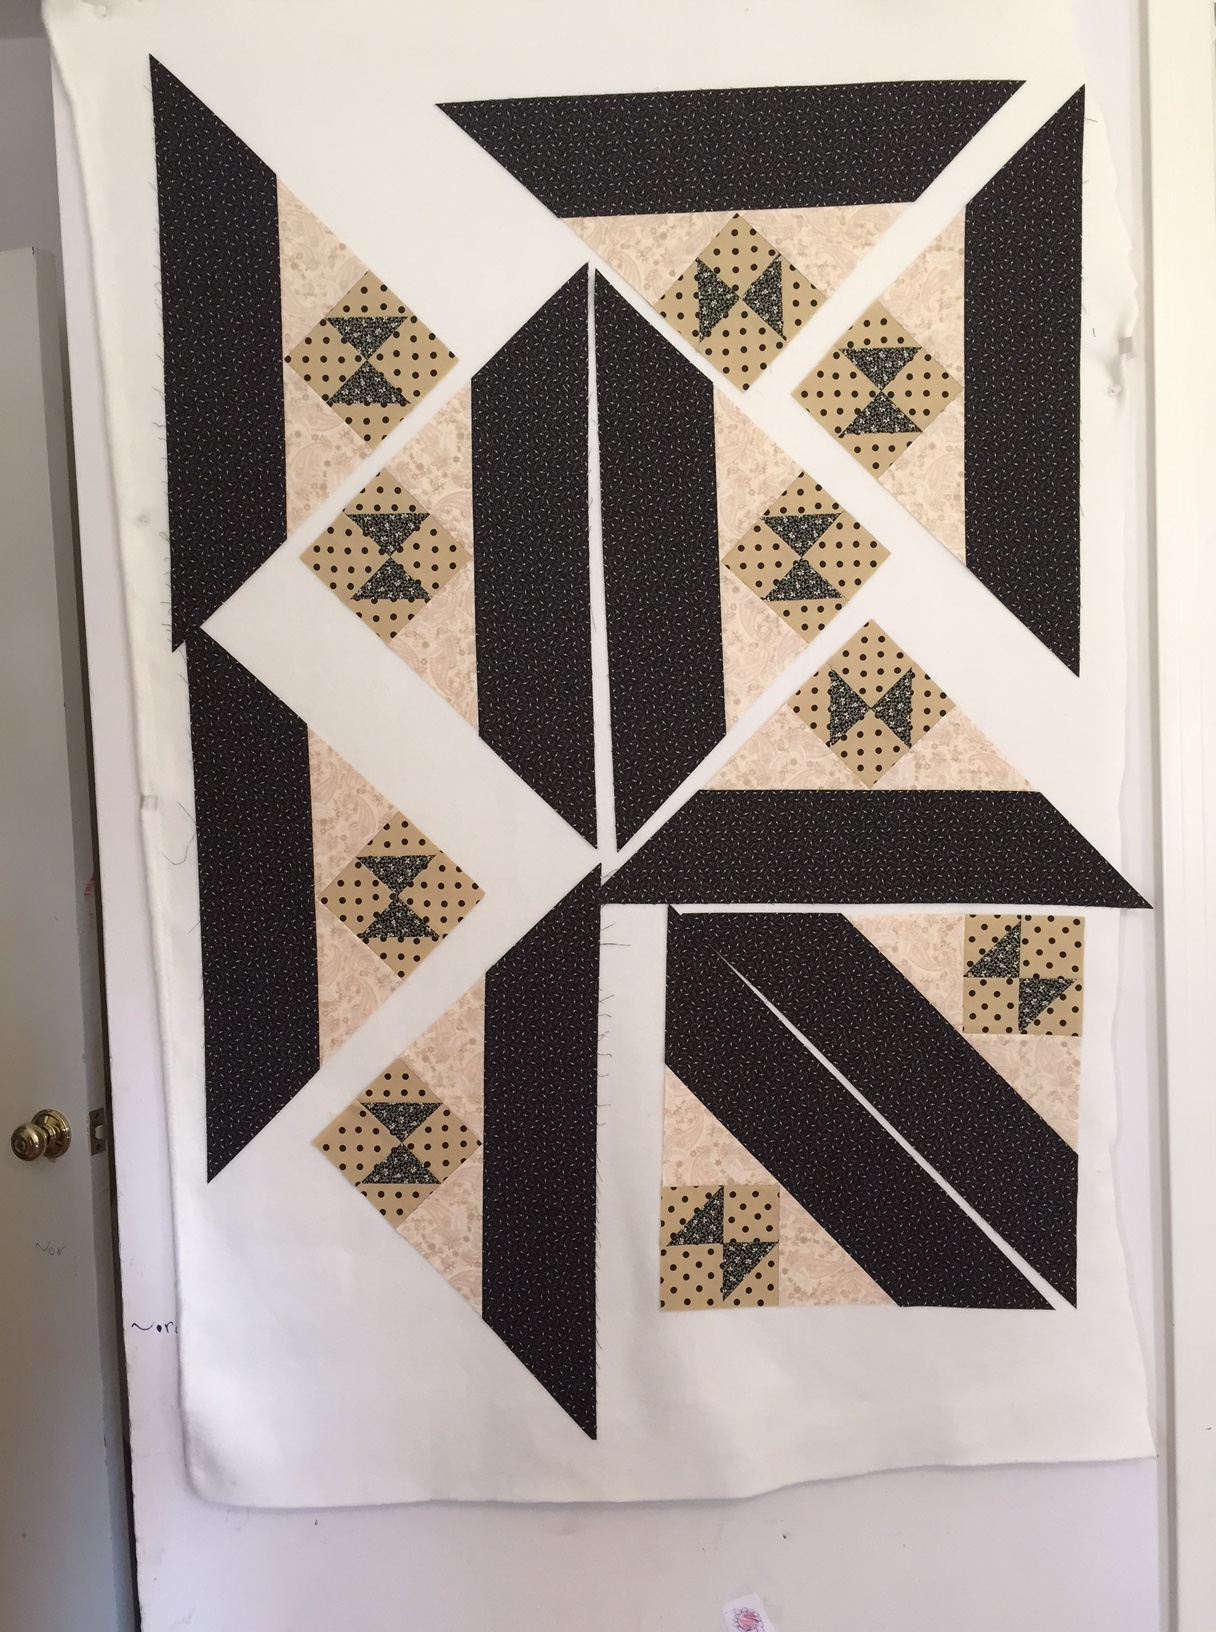
Here is my new office.  Light, bright and very sterile.  I’m deciding on some custom quilt wall hanging to coordinate and decorate my space.  Not a lot of wall space (just one full wall and that narrow strip you can see in front of my desk – just perfect for a wall “runner”:

IMG_0922

We also had a huge yard sale, which wasn’t really worth the effort that we put into it.  And Halloween came and went.  Our cat is now as big as my daughter!

IMG_0961

During the same weekend, I was able to get a few hours in at the annual Quilt Festival.  My husband was a great sport about it and went along with me.  First time for Fat Quarter Shop to attend as a vendor and I was very excited to meet them in person!  Love their new t-shirts – super soft!  I also stumbled into the booth for Red Crinoline Quilts without realizing it.  But I looked around and thought … “I know these quilts!  Where am I?”  Got some great photo ops with everyone!

IMG_0958

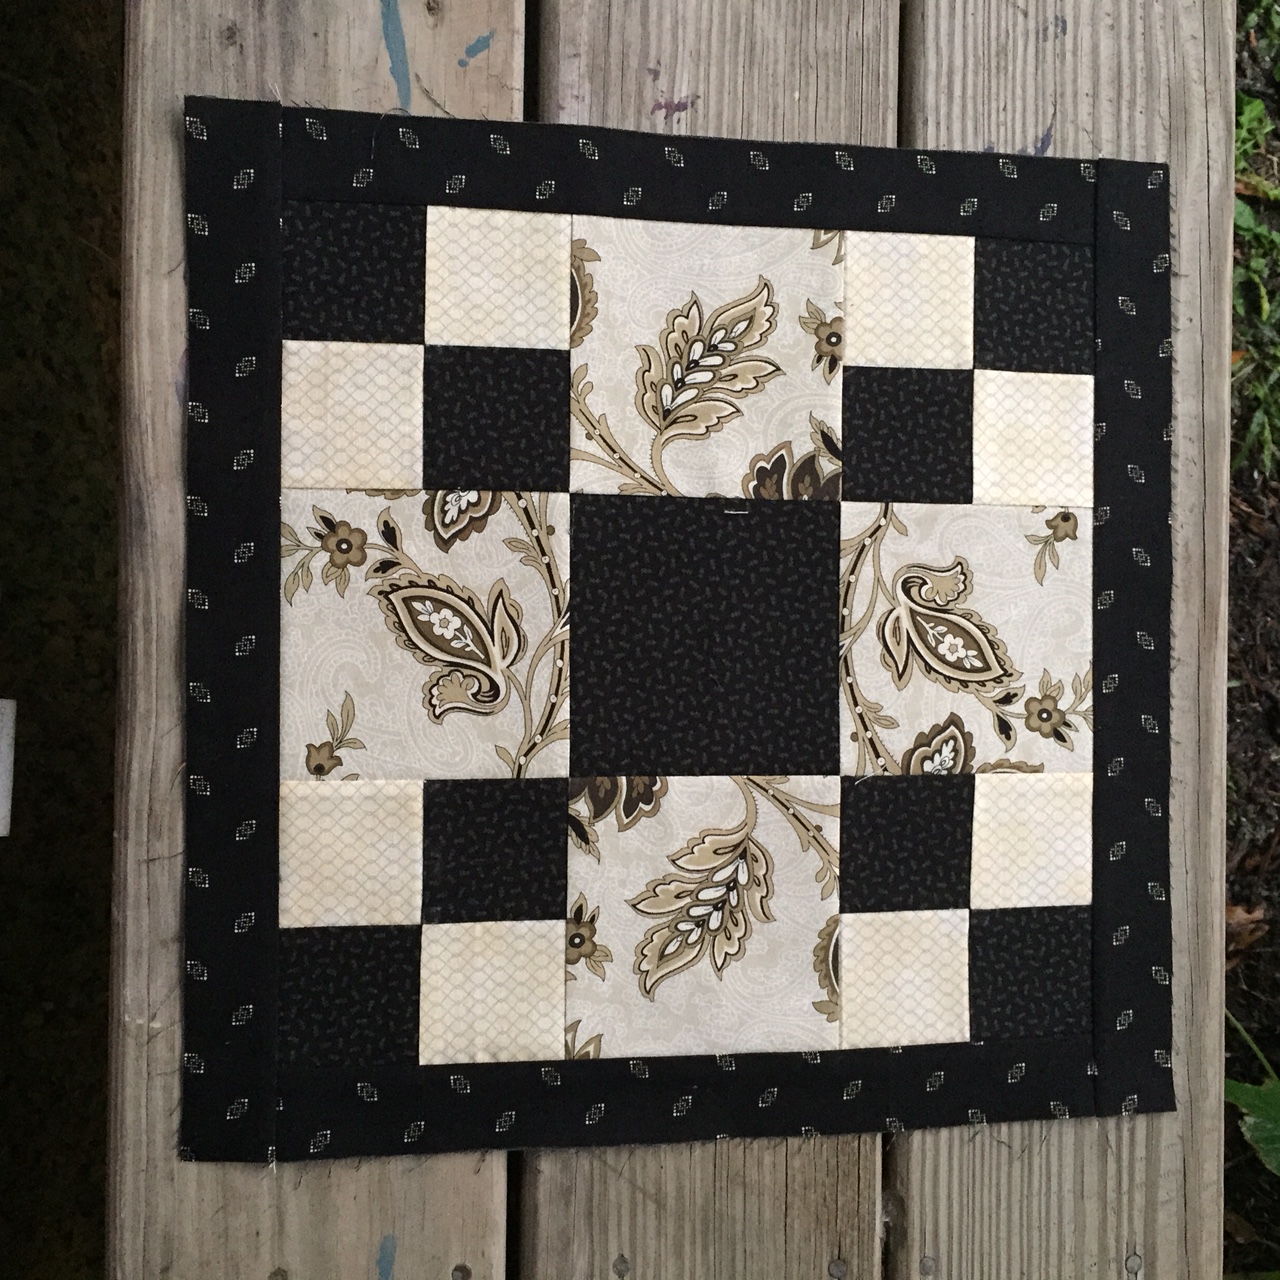
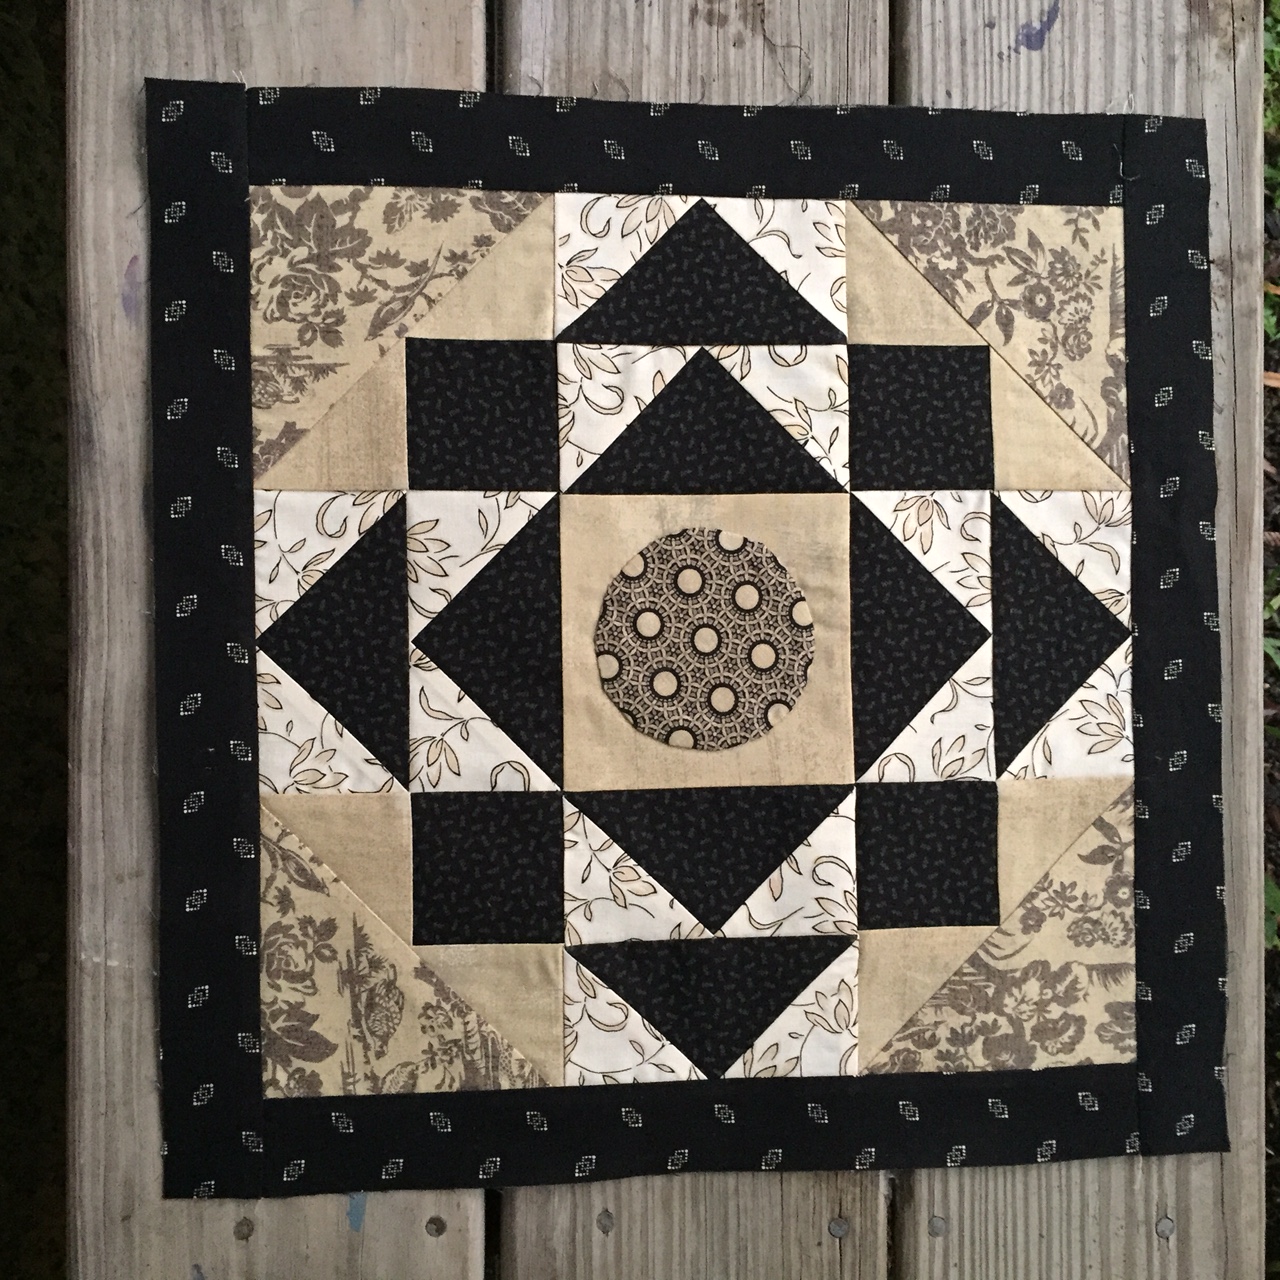
I finally put the binding on this quilt and wrote on a label, using one of the neutral block squares on the front of the quilt (which I did after taking this picture).

IMG_0966

Then, this past weekend, I decided to buckle down and start on a quilt for a dear friend.  I thought about getting my Reach for the Stars done and gifting it to her, but I think she would really like something more colorful (but not too bright as she has told me).  Dawn – you would be proud of me … I at least put on a couple of the inside containment borders, and I left my stuff out and available to get back on this ASAP.

IMG_0968

So – I went back to my original plan of Sandy Gervais patterns and fabric.  I had selected the Fine China pattern with the Rambling Rose fabric collection to make for my friend.  But, the quilt would end up being a huge 102″ square.  And I need something a little faster.  You see, my friend has been diagnosed with metastatic liver cancer which has already spread to her lungs and stomach.  We are hopeful for the treatment therapy (oral chemo) to work a miracle for her.  I am devastated by the impact of such a close friend going through this.  I work with her every day and I just have no thoughts other than positive to keep her around.  So, I took my fabrics for Fine China and am now going to make them into another Sandy Gervais pattern called Rose Garden.  I think it will be a great fit for my friend’s personality and tastes.

I grabbed this screen capture from Sandy Gervais’s website that shows the completed quilt.  You can follow this link to see the pattern details and order directly from her site.

Rose Garden Picture

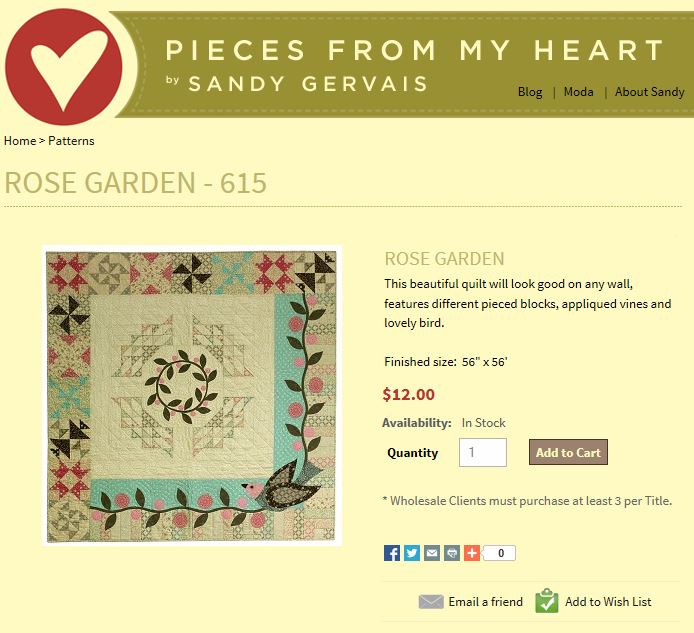
You can see I’m using the same fabrics as she did, but I am planning on finishing it a bit different with an extra border in the aqua/rain color print on the left and top sides.  I want it big enough to be a lap/couch quilt.

IMG_1012

So, it is a labor of love and I’m enjoying the soothing, romantic feel of the Rambling Rose fabric.  I hope you are finding inspiration today in your projects as well.  Thanks for stopping by and I hope to blog again soon!  If you want to check in more often, you can follow me on instagram at jengwyn and I hashtag my posts with #seamscrazyquilts.  I think I’m doing it right.  Not entirely sure!!

Jennifer

Work or Play?

Ok, so I haven’t done any work yet like I should have today.

I started putting together my RFTS center and based on the layout, I wanted to put the opposite corners together first.  Then I was going to stop there, get some work done and – you know – if there was time, put some more together.

End pieces

I even folded these sections up and set them to the side for tomorrow or later this week.  Then, maybe 10 minutes later, I thought … well – I’ll just do a couple more blocks together to have a head start.

Of course, I finished the piecing for the center, with the exception of the outer corners.  Here it is layed out on my queen size design (guest) bed:

Center Pieced

I really can’t believe how easy it came together and how much it looks like the cover photo from a distance like this.  I really, really love it and I can’t wait to get it finished.

I was stitching while watching the GB/Seahawks game.  That was a crazy game, right?  And I don’t normally watch football, but that was a good game to watch.  The other game, not so interesting.

Did you have a great weekend?  I hope you got to do some stitching as well!

Now it’s time for me to work…

All my best,

Jennifer


Ready, Set, Assemble!

I amuse myself that I was so intimidated by making side setting triangles for my blocks.  I have no good reason why, I just thought it would be difficult for them to come out right.  There was no reason to worry…

Side Triangles Closeup

They came together just fine.  All 10 of them…

Side Triangles

This is, so far, the safest place from napping cats that I can find.

Now – just as a teaser preview – this is what I’m about to get into.  Assembly of the rows to make the center portion of the Reach for the Stars quilt.  I just randomly grabbed four of my blocks, so you can get an idea:

Preview

Oh my, I can’t wait to see this come together.  It is going to be really hard not to work on it day and night – but this is my busy week at work (and I’m actually at work right now on a Saturday).  But… I’m sure a few minutes tonight to see it get started won’t hurt!

Maybe I’ll see you again tomorrow with an update!

Jennifer


Saturday Sewing

All 14 blocks for Reach for the Stars is done! 

I picked apart and reconstructed Block 12.

Here’s the old one:

RFTS Block 12

And here’s the new one (I forgot to set them on point for the picture):

RFTS Block 12 Redone

Much lighter feel to it.  Love it now.

And, drum roll …, Block 13 was completed today!  I even followed the directions for some of the pieces that were in 1/8 cuts, but it came out easier than I expected.  I used the Fit to be Geese ruler by Open Gate Quilts for my flying geese units.  Perfect every time.

RFTS Block 13


As a reminder, here is a picture of the cover quilt, designed and pieced by Terri Krysan and published in Quilters Newsletter magazine from Oct/Nov 2013 to Oct/Nov 2014.  I have the center medallion and the 14 surrounding blocks done now.

RFTS Vol1

But if you have made a quilt or two, you know as well as I do that I may not even be halfway through the work yet.  Those setting triangles, inner border and especially that pieced outer border will likely take as much time as the blocks did.  Better get started!

If you would like to see an exemplary completed version of Reach for the Stars – you MUST visit Dawn’s blog at First Light Designs.  She not only got her quilt top done before the end of last year, she has already gotten it back from her quilter and it is spectacular!  Dawn went with some cool tones of blue and green with black accents and it really makes the blocks pop out.  You can click HERE to visit her post from Jan 4th and see all her pictures.

I’m still doing well on a little quilting activity every day, even if it is 5 minutes to look at fabric choices.  I’ve gone a week without buying any new fabric, so that’s a real accomplishment for me.  Fortunately, I was already enrolled in some BOM programs, so a squishy package comes to my door anyway a few  times a month.

Hope you are having a snuggly weekend.  We have watched TV, eaten pizza and tried to stay warm inside.

See you again soon!

Jennifer

Sewing Sunday

I have kept one resolution and have broken another.  I have so far done some sewing every day this year, but yesterday – I had to break my resolution to not buy any fabric.  I made it 3 days.  Not even.  But there has to be some concessions for emergency fabric – right?

I got out my Quilters Newsletter magazines to find where I had left off on Reach for the Stars.  I needed to make Blocks 13 and 14, the last two blocks before getting into the setting triangles and borders.

As I was sifting through my stash, I pulled out the fabric I had for the sashing strips – so I could go ahead and cut them for these last two blocks.  And wouldn’t you know it …. I am short one strip.  I don’t know if I thought what I had would be enough, or if I’m not finding another piece that I have or what.  I need two little sashing strips that are 1 1/2″ wide and 14 1/2″ long.  Of course, the American Gothic collection by Pam Buda has long since sold out on Fat Quarter shop and I didn’t find what I needed on Etsy or eBay … so I did my Google search and found some from Old Country Store Fabrics online.  I guess I’ll have it by next weekend.

You can see the two blocks below that I have left to complete.  And my remaining two sashing strips for the last block, waiting for their partners.

RFTS Mag Sashing

To get back into this groove, I decided to piece Block 14 first – the simpler of the two.

RFTS Block 14

So, that leaves Block 13 – right?  Well, actually, I’m going to pick apart Block 12 first (see below) and select a different set of fussy cut pieces from my focus fabric to lighten it up a bit.  I never quite liked it.  The florals are too big for the block.

RFTS Block 12

Ready, set – go back to school time!!

Jennifer

Works in Progress

Oh my… it is Friday again.  It has been one tough week at work.  I’m not sure I have mentioned it, but I had joined a gym a couple of months ago and was going at lunch three times a week.  This week, I cancelled all my training sessions and I can really tell.  No excuses next week.  Back at it again and forget how busy work is – that one hour makes a bigger difference.

This month, the AYOS (and a little bit more) monthly selection is “HARVEY”.  It is a bed size quilt pattern using charm squares and a background of your choosing.

Harvey Pattern Cover

I wouldn’t have jumped into it this month because of all the other crazy stuff going on – but I had the perfect leftovers from my MODA LOVE quilt top.

Moda Love Round 3

All of those leftover HST squares made from the larger 9″ square sizes are just right for trimming down into smaller HST blocks for HARVEY.  Plus I have a ton of charm squares left in the variety of American Jane collections that need a good home.

SO… I went ahead and started down the path…

Harvey WIP

It’s just a start and we’ll see how far I can get by Halloween.  Each of my leftover HSTs gave me two smaller HSTs for Harvey and one even smaller HST for another future project (or embellishment ideas on these two quilts).

Another project that is pending is my Reach for the Stars quilt.  I have the last two regular blocks left to make and then all the setting pieces and border.  My problem is that I keep finding fabric that I really want to have in the quilt, so I keep collecting it – but I now have enough black/white/neutral fabric to make at least two more!

RFTS Project

I LOVE this small black button on cream print that I just got from Rossville Quilts this week (Aster by Williamsburg for Windham Fabrics).  I got a few other fat quarters in the same collection.  I also ordered another Palm Court panel which is my focus fabric for the quilt.  I wanted to have total choice when I got down to those last few blocks.

I MAY have also ordered a few half yard cuts of Smokey Quartz Gentle Flowers by Quilt Gate Fabrics when it was on the FLASH SALE by Fat Quarter Shop (55% off!!).  I don’t have it in yet, so I’m not sure how well it will match up.  I think it will be great though.  Like I said – I am loving collecting the fabrics for this quilt that I’m almost done with!  LOL!!

Finally, for today at least, I’ll share my other project underway.  It is doing SOMETHING with my stash boxes.  We recently disposed of my sons mattress set and gave him our guest bed mattress set.  That was also my design bed in my sewing room.

I had been slowly filling up every nook and cranny in the guest room with my boxes from fabric purchases.  They went under the bed, in the closet, around the walls, under the ironing board, under the cutting table, etc…  Here are some pics this morning of them in their full glory:

Stash Room 4


The door chest/armoire above is filled on top with precuts and the drawers have extra yardage I bought in a store closing clearance sale.


Stash Room 3

Oooo … I forgot I had that Vintage Modern quilt kit (see below pic) …  And I love those kits that come in the collectors tin lunch boxes.  I have at least four of those.  No wait ..six at least.  I had bought two others that are in the other closet.

Stash Room 2 Stash Room 1

My husband thinks I need an intervention.  I just need some good organization.

And this is just the stuff I’ve collected since I moved here.  I have another closet upstairs (and maybe a few drawers) filled with my initial stash collection that I don’t even look at.  I’m not sure what to do with this, but I wanted to grab a few pictures today because I will be doing something before the new bed arrives later this month.

I feel that I have purged and gone to confessional now.  Thank you!

Have a wonderful weekend with family, friends or just some good alone time.  Whatever makes you happy!

Jennifer


I’m reaching … and almost there!

I am still working on my Reach for the Stars quilt.  This is an installment quilt project published in Quilters Newsletter.  We are now up to issue 5 of 7 of this installment.  The last two issues will have the final two blocks, the setting triangles and center assembly, and then the quilt borders.  This has been my favorite quilt so far to work on along with so many others who joined in an impromptu Sew-Along journey.

The latest publication included the instructions for Blocks 10, 11 and 12.  Here they are!


Block 10.  I sewed this and found cut corners, so I unpicked a lot of it, tried again and found I had pieced in a section backwards.  Unpicked it again and finally got it right the third time.

RFTS Block 10 v2


Block 11.  Went together easy-peasy.  Photo is kind of blurry.  I made my own directions to come up with the 8 HST units and four flying geese units.

RFTS Block 11


Block 12.  This one should have been a no-brainer.  But with the opportunity for fussy cutting, I took the longest putting this one together.  I have to be honest and say that this is probably my least favorite block.  I don’t know why, but I just am not ‘feeling’ it.

RFTS Block 12

Here’s a closeup of the fussy cutting areas.  I really wanted a ‘lighter’ feel to the fussy cuts, but I didn’t have that much to select from on my remaining focus fabric:

RFTS Block 12 Closeup

So… do you want to see how all the blocks look together at this point?

My design wall isn’t big enough so I have laid them out on my ‘design bed’.  I should have put a white sheet underneath, but I didn’t.  So just ignore the clashing comforter pattern you see…


RFTS Spread

And another angle… I am only just over 5 feet tall and I was holding this camera as high up as I could, taking a blind shot, without going through the effort of getting a stable chair to stand on.  Therefore, this picture is a bit blurry also:

RFTS Spread 2

I still have the outer sashing to put on my center medallion.  I’m still contemplating the fabric, but it will probably be this polka dot.  Still deciding though…

RFTS Center


I can’t believe I may have this quilt finished this year.  I am going to splurge on some custom quilting if Linh agrees to it.  So excited to see this one come together.


As I mentioned before, and shown on my blog, there are others who are also doing this quilt.  Dawn at First Light Designs has done a better job of sharing pictures from our friends.  Please visit her website to see her pictures and those of Dawn, Jennifer T, Jennifer V, Sherri C and Colleen.  She is showcasing four new blocks from Jennifer V in a post today!


Finally, I’ll leave you with a Kitten Centerpiece idea for your dining table.  It’s all the rage right now!

This is Olaf (girl), Kristoff, Sven, Anna and Elsa (boy).  Our five kittens.  We named them before we knew if they were girls or boys.  No changing vet records now!

Kitten Centerpiece


Have a great, safe, happy and relaxing 4th of July holiday (for those of us in USA).  GO COLOMBIA!   My favorite now for winning the World Cup.  They play on Friday.

All the best,

Jennifer


Sherri’s Progress and My Block 9

I wanted to share progress pictures from Sherri who is doing the Reach for the Stars sew-a-long.  She’s keeping the pace and has completed blocks 5 and 6.

I don’t know what I did wrong with transferring her pictures, but her individual block pictures keep coming out super small.  But her group photo looks great!  Block 5 is that pinwheel bear paw block and Block 6 is the bottom left block.  Love them all in this picture, especially with the striking sashing attached!  You can really see the quilt taking shape now!  Thanks for sharing Sherri!

RFTS 3-30


I didn’t snap a picture of my Block 9 this weekend, so here it is now.  This is the last published block at the moment.  This may be one of my favorite blocks so far, and it was probably the easiest.

Picture taken on my desk, excuse the media cords cluttering it up.

RFTS Block 9

That’s it for tonight!  See you again soon!

Jennifer


Aaaahhhh, That Feels Better!

Wow, I needed that.  A few hours spent on quilting and piecing is the best therapy.  It isn’t free – but a lot more fun than an alternative!

I splurged a few weeks ago and ordered a 14 1/2″ square Creative Grids ruler from FQS.  It is the same size as the unfinished RFTS (Reach for the Stars) blocks with their sashing added:

14 5 CG Ruler

The hardest thing about the ruler was getting the plastic wrap off!

I was able to put the ruler to use twice already this weekend!  I finished Blocks 7 and 8 for RFTS:

RFTS Block 7

Reach for the Stars – Block 7

I was initially freaked out a little by the block, due to the light pattern instructions … but I broke it down into the components and it went together really well.  The longest part was selecting the fussy cut areas for my applique circles.

RFTS Block 7 Center

Block 7 – Center

Then I moved into Block 8.  At first glance, I thought … easy peasy!

RFTS Block 8

Reach for the Stars – Block 8

Well, poop.  Actually I said !@#$!@#$ a few times last night.  With no finished sizes given for the sub units, I tried to oversize my cuttings so I would be able to trim down, but then I didn’t know what size to trim down into!  Here’s a hint for you though … the center fussy cut square-in-a-square ended up being 4 3/4″ unfinished when I was done.  Perhaps it is suppose to be 4 7/8″, but it worked out well for me at the other size.

Hint #2 – I did try to follow the pattern – but when they show you piecing the two sides with the corner squares and flying geese unit – piece the flying geese unit first, then add the squares.   That is different than the instructions.  My Open Gate Quilts Flying Geese Ruler worked great for this step too.  Line up the side triangles to the pieced center triangle at the bottom first, and let the overhang fall off at the top points.  The side units will be 3 1/2″ by 12 1/2″ when you are done.

RFTS Block 8 center

RFTS Block 8 Center

You could certainly change this up and make 4 complete flying geese units with 4 corner squares and a center ‘square-in-a-square-in-a-square’ unit.  You will have a few more seam lines in that black star – but it might work better for you if you are doing this block.

RFTS Block 7 - 8

RFTS Blocks 7 and 8

I wanted to give up after I realized I would have to unpick the whole thing (except the center flying geese units).  But I persisted and was done at around 2:15 am.  So glad I made it though!  They look great.  Added the sashing strips this morning and got a group shot on my design wall:

RFTS Blocks 1-8

RFTS Blocks 1 – 8

What’s next you ask?  Well – there is still Block 9 instructions for RFTS in the latest issue of Quilters Newsletter, and I also got Block 10 this week from FQS on their 2013 Designer Mystery BOM.  It will be a row of flower blocks!  Cute I tell you!!\

DMBOM Block 10

I love that I am going between bright, happy colors and the soothing, calming colors in Reach for the Stars.  Variety is a spice of life!

Tomorrow I will share pictures from Sherri Crisp in Knoxville.  She has more blocks done for RFTS too!  I just didn’t want to picture overload you.  You can jump over to Dawn’s blog post (here) and see the pictures though, if you are in a hurry!  She has posted since then also, with more participation pictures – go check it out!!

Have a great, wonderful, quilty, relaxing, fun weekend!  (See how a little quilt therapy cheers me up??)

Thanks for stopping by – I love your comments too!

Jennifer


Busy, busy, busy…

I wish I could say that I had been sewing in secret and that I had three finished quilts to show off…, but that just isn’t the case.  Not much time devoted to my hobby at the moment.  Last week, I did get done with the 9th block in the 2013 Designer Mystery BOM by Fat Quarter Shop.  It is the last house block in the row quilt.  The last three blocks are a mystery to me.  We have had three basket blocks, three star blocks and three house blocks.

I was only having to look for one piece of fabric to make my two blocks from one package this time.  The facing of the house between the door panel and the roof line called for a 6″ square of fabric, and I only had a piece big enough for one.  No worries though, last month’s package had a perfect piece that I used.

Here’s version 1 of the block:

2013 DMBOM Block 9 v2

And here’s Version 2:

2013 DMBOM Block 9 v1

And here they are together on my driveway!

2013 DMBOM Block 9

The more I look at my six house blocks, the more I know I will embellish with some creative embroidery when I’m done.  Little doorknobs, and maybe some flowers in the window boxes.

Jennifer Thacker from Houston has also been getting some sewing done.  She has completed Block 2 of the Reach for the Stars pattern.  Her block is perfect!  Love the paislely center in its frame… take a look:

JT RFTS Block 2

The next edition of Quilters Newsletter will be in my mailbox soon – I got the digital edition email yesterday.  Three more ready to go!

Finally, I celebrated a birthday yesterday.  I had a great day, surrounded by wonderful friends at work and family at home.  One of the ladies at work made me a beautiful pink fondant covered cake, with hand crafted roses.  The kids had fun lighting and relighting the candles last night.

I am truly blessed.

Lighting the Cake

Thanks for stopping by today!

Jennifer