100th Post! Starting History Journal

Good day to everyone!  Thanks for visiting my humble little blog.  I started this a little over a year ago and it has been a good way for me to express my joy of quilting in a forum that doesn’t push it on those who don’t care (like through my personal Facebook profile).  I’m always excited to get comments and feedback and to see how many people have visited my blog pages. 

Today is my 100th blog post!  Yay!  Celebrate!  Also, I’m too cheap to get a fancy blog that can do neat visual effects and stuff, so you get things like .. Yay!  Celebrate!

🙂  Ok … so I thought I would finally start my quilt history entries.  Another reason I decided to do a blog was to capture my quilt accomplishments and always have a place I could come to look back on my life in fabric.

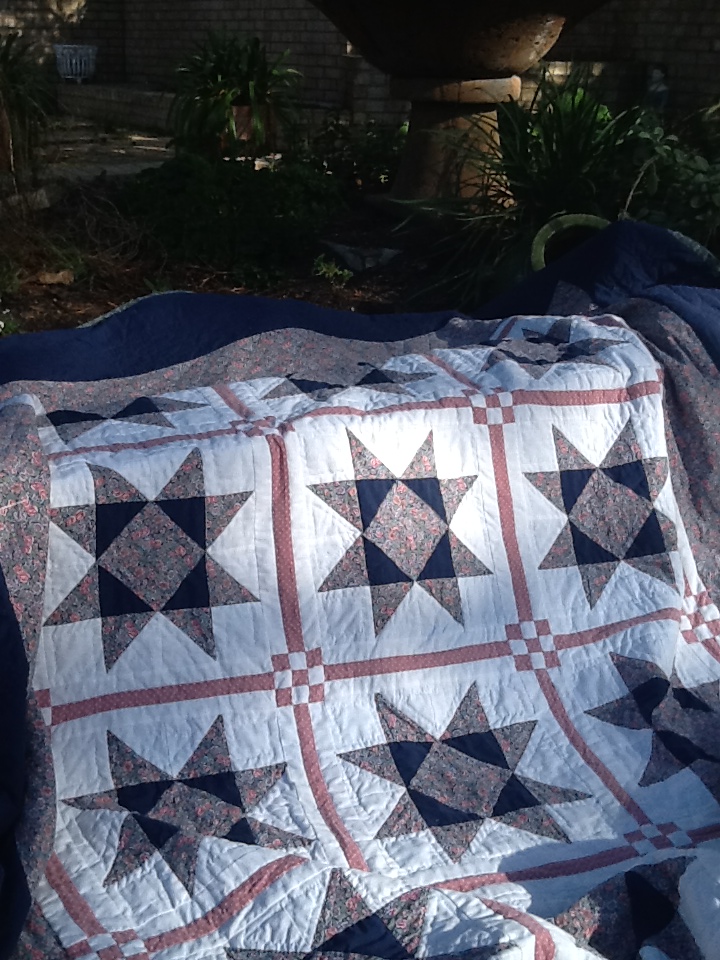
I am starting with a quilt I made for my brother when I was at Texas A&M in Bryan/College Station, TX.  I remember it quite vividly (more so than the classes I attended that semester).   I think the year was 1993?  Maybe?

I did my cutting using a yardstick, clear protractor, dressmaker pencil and orange Fiskar scissors.  NO rotary tools back then!  I marked every quarter inch seam allowance before I sewed my pieces together.  I did my piecing on the coffee table, while sitting or kneeling on the floor in front of it.  I bought my fabric from the Hancock Fabrics chain (similar to Joanns) or even Wal-Mart.  I had no idea there were actual quilt shops with different quality of fabric available.  I didn’t know anything about designers or manufacturers such as MODA.  I was just emulating my grandmother. 

Will Quilt 3

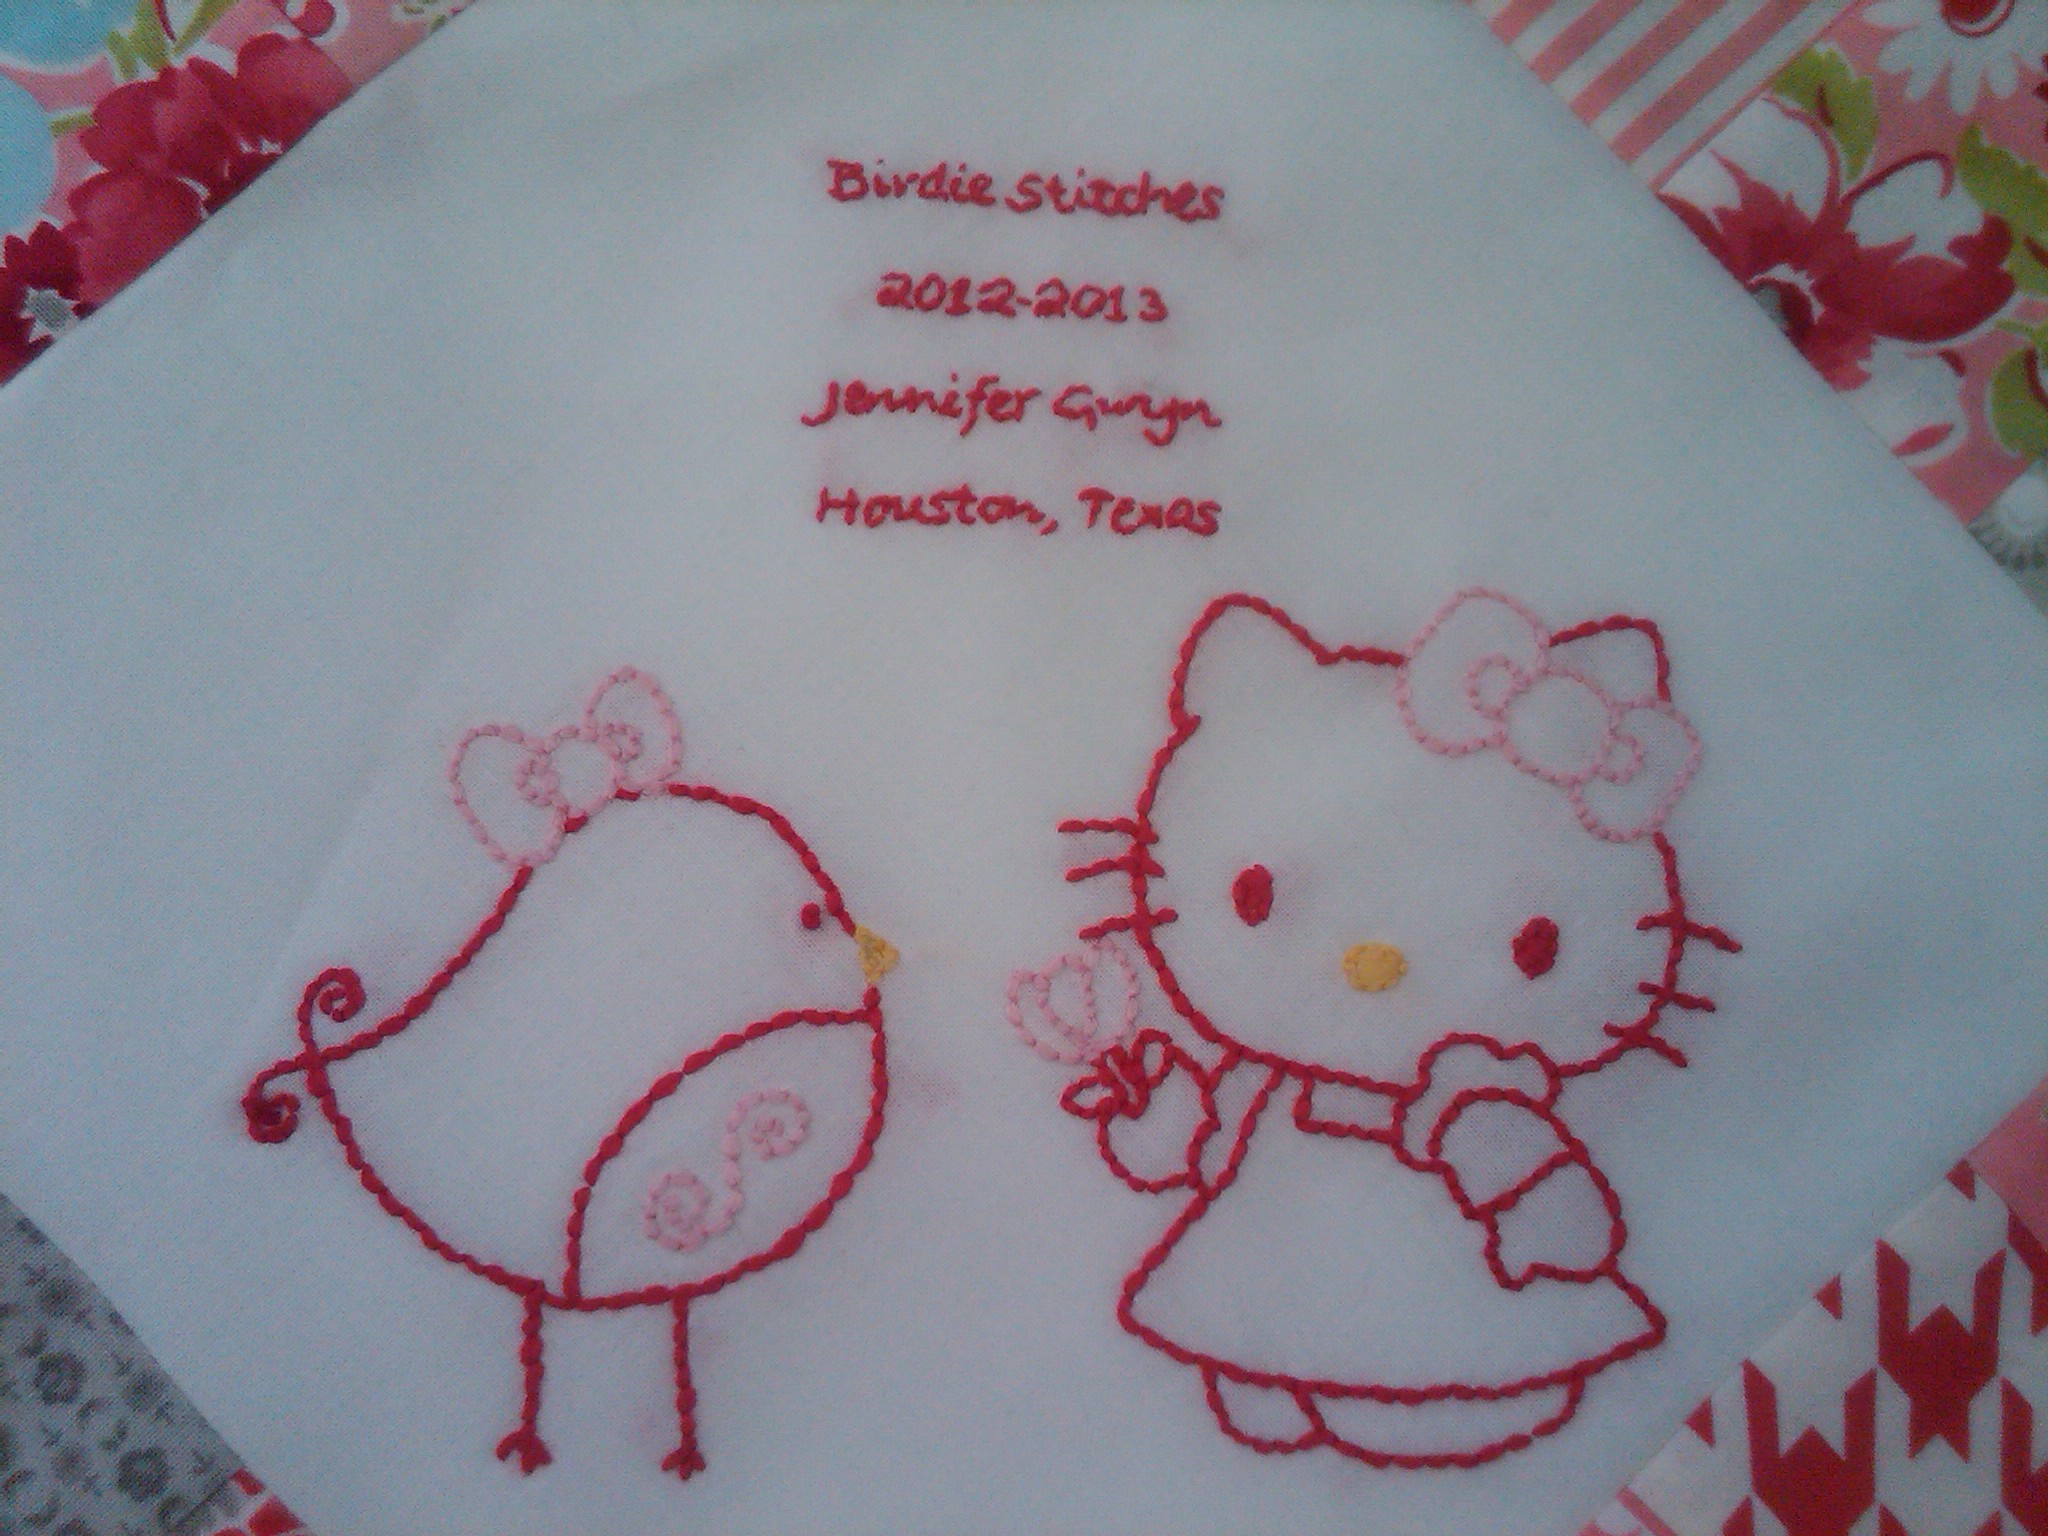
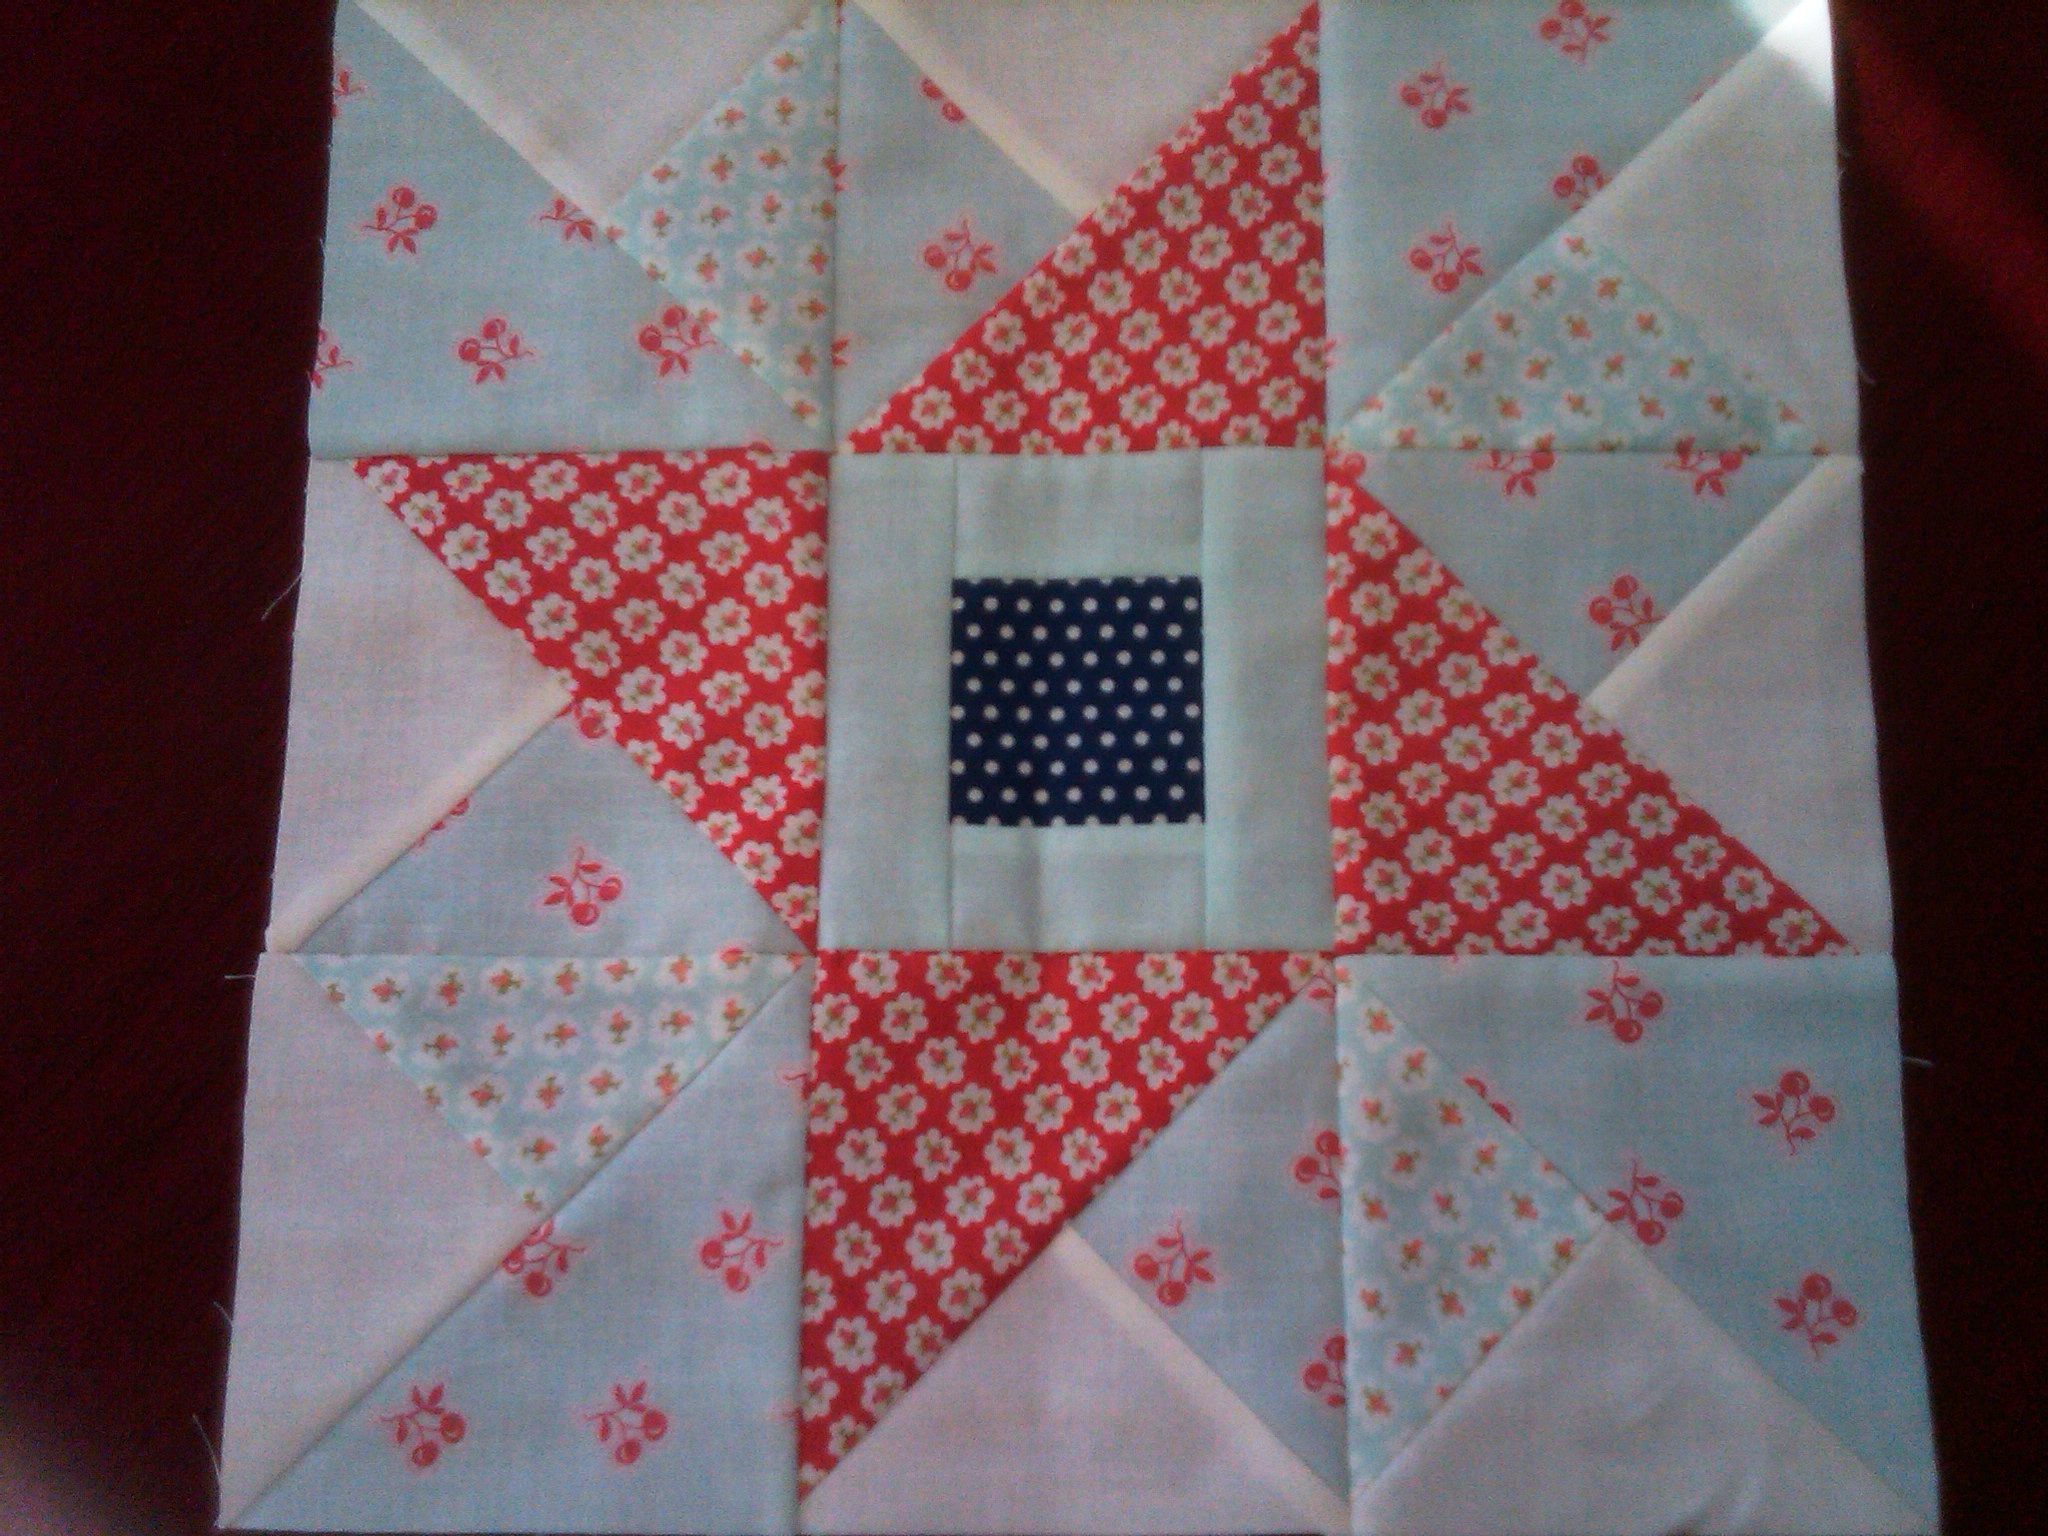
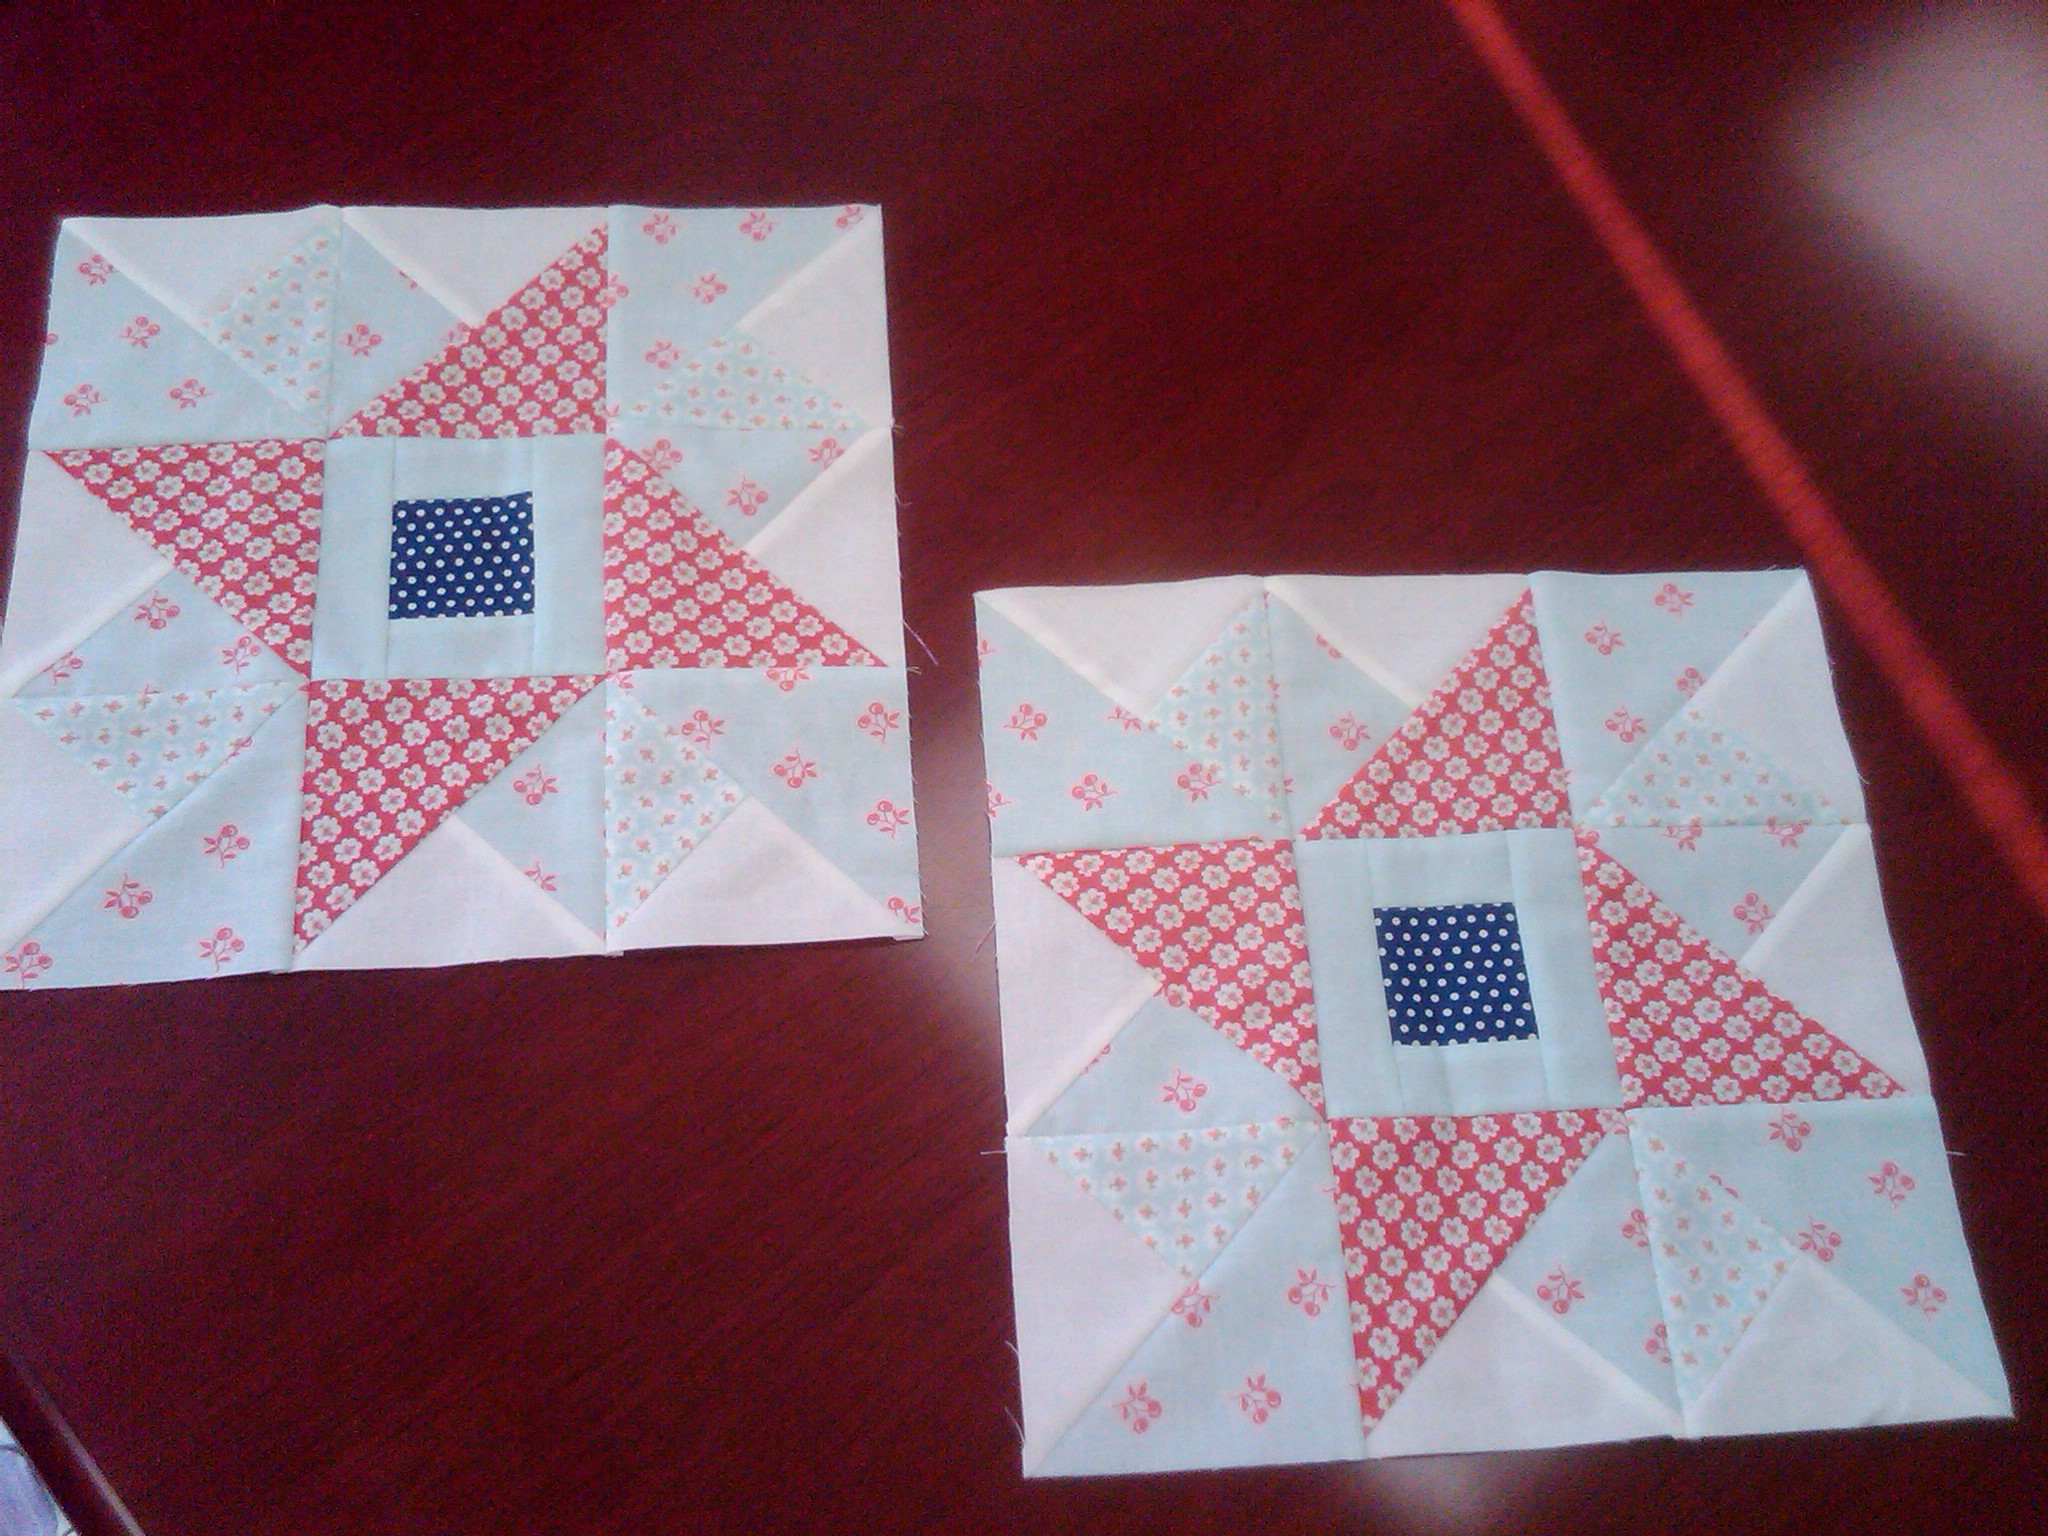
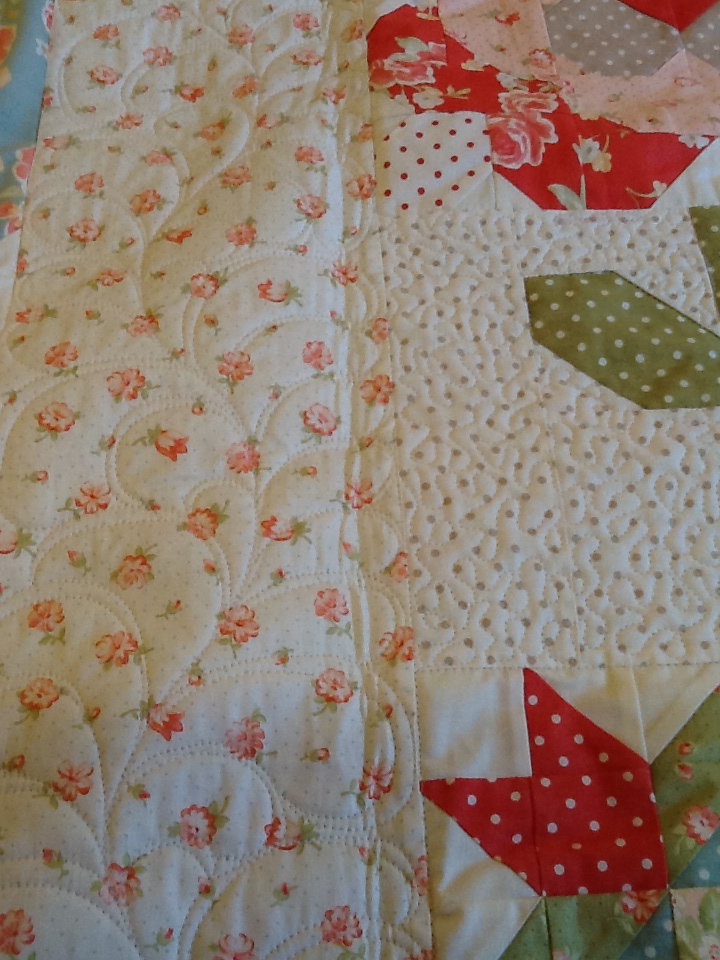
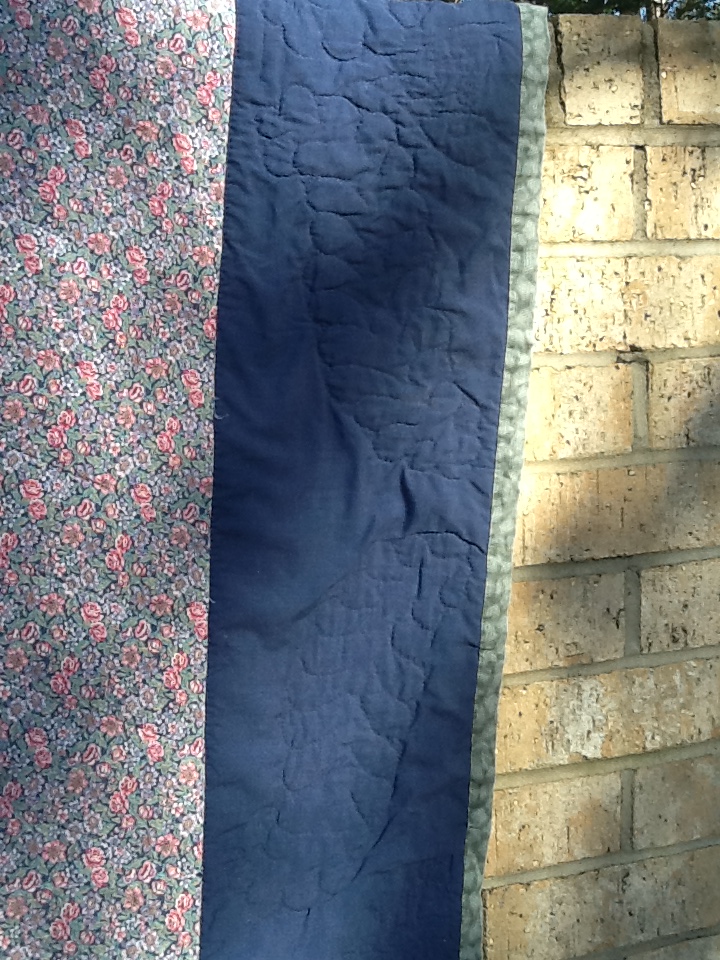
That mauve calico print was very popular – I remember that much.  The pattern probably came from my Better Homes & Gardens (or was it McCalls?) guide book which I had subscribed to as a ‘pattern of the month’ program.  I have a very large 3  ring binder and once a month, I would get an envelope for a new pattern and a sheet of plastic with the templates drawn on them for me to cut out and use, if applicable.  This may have just been called Ohio Star.

Will Quilt 2


After sewing it together, I had purchased a PVC pipe quilt frame by Q SNAP to do the quilting by hand.  I probably used safety bins to baste it.  I don’t remember that part.

Will Quilt 4

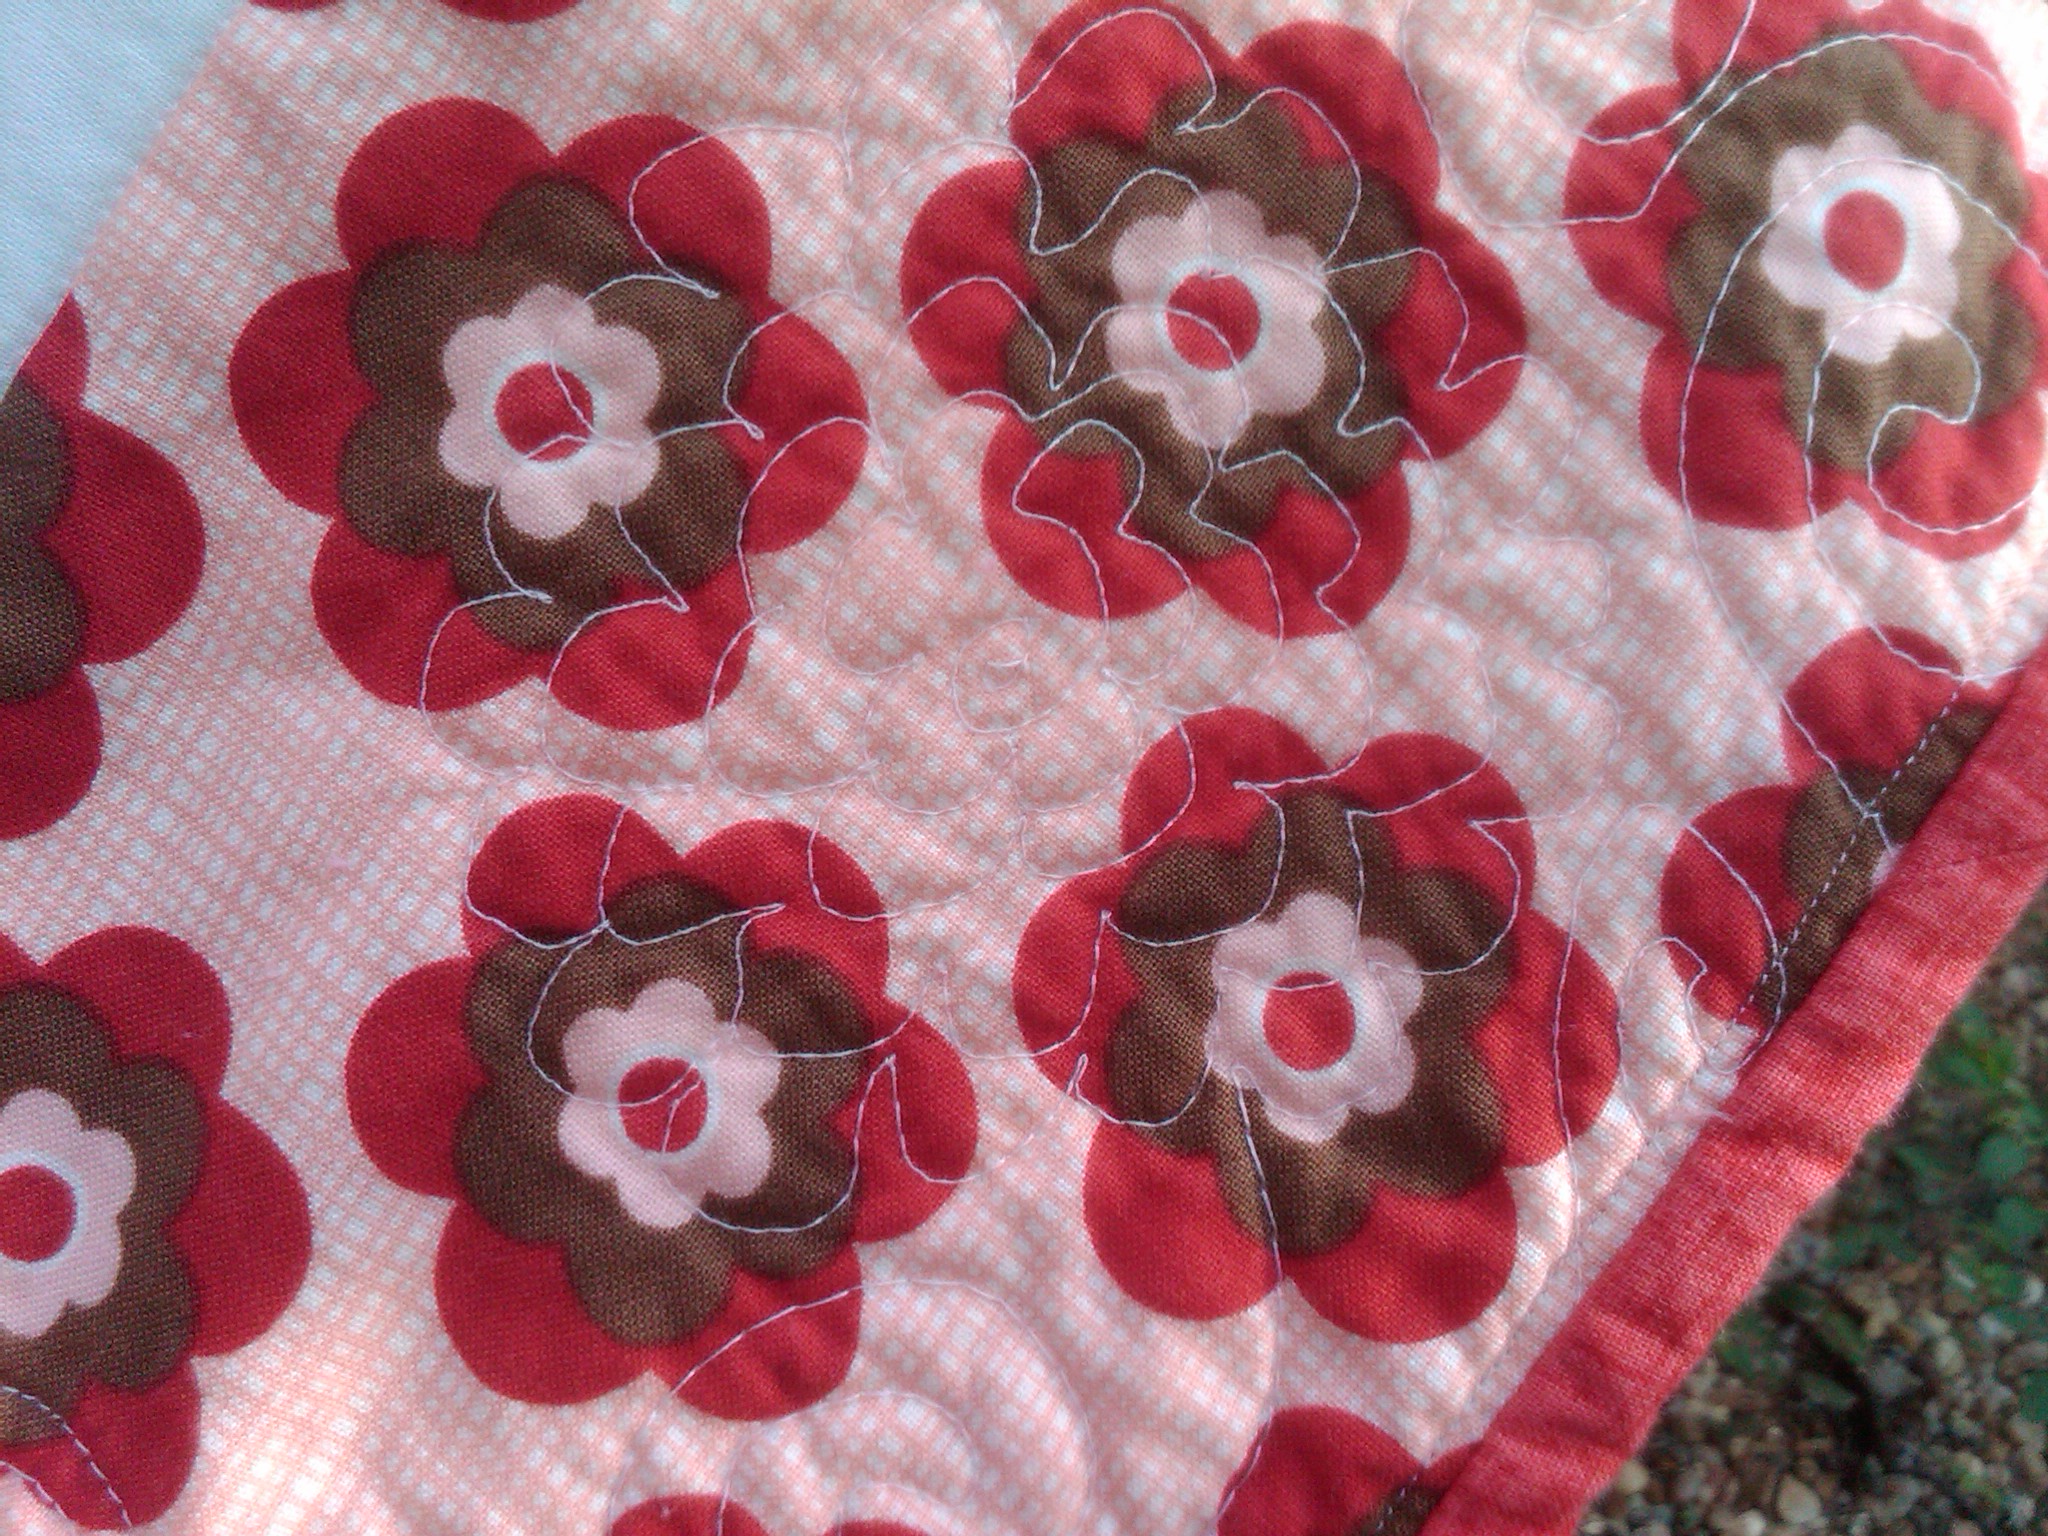
I used a piece of chalk and a quilting template to mark different designs on the borders.  You can see above, barely, my feather design.  And below, you can see my simple outline/stitch in the ditch quilting for the blocks and some diagonal lines for the inner border:

Will Quilt 5

Finally – a sunflower motif in the corners:

Will Quilt 6

I had to request my brother to bring me this quilt this past summer so I could photograph it.  I can tell it has been washed more than once and been well loved.  I am so happy about that!  The binding doesn’t feel as though I have any batting in it and it is starting to wear out and wear thin in some spots.  One day, I will offer to rebind it for him. 

Hope you enjoyed my nostalgic look back.  I will share more projects next week.  As I complete a showcase, I will move a picture of that quilt to my History tab here in WordPress.

I appreciate those of you who visit my blog and thanks for being here on my 100th post!

Jennifer

Last block done – ready for setting squares!

I’m getting super excited to see how this is all going to look put together!  I finished up the last block, which I wanted to do free style and add in most of my label information.  I will still put a small label on the back after I get it quilted to give the information on who quilted it, the date it was quilted, and the pattern designer, Little Miss Shabby (click link to get all the block designs and past  BOM instructions).  But my part is getting done this year!  I mean it!

Here’s the last of the 12 blocks:

BS Signature Block

I couldn’t resist adding Hello Kitty to my birdie blocks.  My daughter has always loved Hello Kitty and I will therefore always have a reminder of this time in our lives when she was this age.

BS Sig Block Closeup


I’m hoping the embroidery threads don’t show through when I get the batting behind it.  In this picture, I have a sheet of white paper behind the block and you can see the thread tails a little through the white background.  This is the only block that I varied from 100% redwork.  I wanted it to stand out and be extra special.

The centers of these blocks are 8″ finished.  I need to research some ideas (or ask a few of my favorite bloggers) what to do about quilting in these areas.  Of course I don’t want the quilting to go over the embroidery threads, but I don’t think I can leave 8″ unquilted either.  If you have some ideas – please share!!

I also spent a couple of hours trying to work with my EQ5 software to come up with a layout design for the finished quilt.  Now, I haven’t really used the instruction book or anything to do EQ5 – I just thought it should be very intuitive.  It IS NOT very intuitive.  Or I am not that bright – you choose.  It was actually quite frustrating and I could see ways to make it so much easier to understand and use.  I’m thinking about downloading a Quilt App on my iPad and trying it out.  I don’t remember what it was called, but it is like $15 – so it isn’t cheap (for an app).  If anyone out there can suggest good software for just playing around with layouts and designs and that can also upload fabric swatches and such – i would love the feedback!

Here’s my layout plan.  Right now, the sashing would be 1″ finished and the embroidery blocks are 12″ finished.  The setting blocks would have a 2″ finished square in the corners to mix in with the surrounding squares of the birdie blocks.  I selected On Point layout in EQ5, but then I couldn’t customize the setting blocks – so those four corner squares are hand drawn on the printout.  I think you get the drift…

Birdie Stitches Block Layout


With this layout, the finished size would be about 65 x 82.  A good twin size.  Too big for a wall hanging, but perhaps the perfect accessory as a bedspread for my daughters bedroom.

Next steps are to create the setting blocks and side triangles.  Trying to decide on the background fabrics for those blocks though.  Stick with all white, or perhaps get a coordinating small, light print for the 6 squares and go with white on the border triangles?  Hmmm… decisions still to be made it appears.

Hope you are having a great start to October!  Just three months until 2014 – SEAMS CRAZY to me!

All the best,

Jennifer

Tweet! Tweet! Only one more to go!

I forgot how fast I can stitch these blocks up!  I finished Birdie Stitch Block 12 today:

Birdie Stitch Block 12

I focused on just red and green fabrics for the block, given the Christmas theme.

Close-up:

Birdie Stitch 12 Closeup

Thought I would also share a picture of the back of the block, just for grins.

Birdie Stitch 12 Back

Per the instructions, I use the entire 6 strands of embroidery floss to do the backstitching.  For this block, I used exactly one of those small $1 skeins of DMC floss – Red Color 666 (or 999 if you prefer).

Last block to be designed today.  I am substituting for the June block with a variation of a signature block.  Once done – I can start to play with the layout options.  That will certainly be the toughest part of this quilt project I think!

Hope your weekend is going well!  Thanks for stopping by!

Jennifer

Finally Friday!

Another week bites the dust and we get hyped up about all the great activites we can look forward to this weekend.  A birthday party for a Kindergarten friend and an adoption event for our two little tuxedo kittens.  I’ll have to take a good picture of them soon and share it.  They have grown at wildly different rates.  The one we thought would be the biggest and most outgoing is far outweighed and out-energized by her sister.  Her sister, started off slow and seemed to sleep a lot – but I think she nursed the longest.  And she’s such a spark now!  They are both getting spayed today, so a little extra TLC will be handed down tonight.

Here’s a picture of Jewelry getting ready for her Halloween act I guess.  Freaky!


Jewelry Glowing Eyes

My husband still thinks she is part raccoon and calls her a Hound Dog, which my 5 year old daughter loves to mimic.

On to the fabric though!

I did finish the piecing of Block 4 for the 2013 DM BOM.  Just  a breeze.  I was more careful as I sewed this time, and my block barely had to be trimmed at all at the end.

Here’s Block 4:

2013 DMBOM Block 4 Done

And a closeup of the points that are an exact 1/4″ from the edges all the way around on both blocks!

2013 DMBOM Block 4 Closeup

And the two blocks that I made together:

2013 DMBOM Block 4 Both

I brought them to work this morning so I could photograph them on our conference table, hoping to get better light.  My camera lens is kind of messed up – so still not perfectly clear photos.


So then, I thought, what do I do next?  I have lots of WIP… but I am really getting into this euphoria when I actually complete the project.  Therefore, I decided to knock out my Birdie Stitches embroidery quilt next!!  I’m getting all excited about it again!!  I have only two blocks left, so last night I prepped the December block and got it ready for the stitching.  I brought it to work, in case I decided to do it during lunch.  That little cupcake is actually a needle jacket that I got from MODA at the annual International Quilt Festival in Houston a few years ago.

Birdie Stitching Ready


Here’s a closeup of the marked design, if you can see it.  I’m doing it in all redwork.  You can see more about this project by clicking on my Birdie Stitches tag on the right of the blog.  It was started by Little Miss Shabby a couple of years or more ago and it was the first project I started blogging about.

Birdie Stitch Dec Block


Saturday – here I come!!

All the best and thanks for visiting today!

Jennifer

Progress on 2013 FQS DM BOM – Blocks 3 & 4

I’m doing my best to stay caught up on the new FQS Designer Mystery BOM.

I could have sworn I took pictures of my cuttings for  Block 3 before assembly – but I can’t find them anywhere.  I believe I mentioned in an earlier post however, that I had no problem getting my two blocks cut out from the one package.  I was excited about the block pattern too – it was another basket block.

Here is my complete block (took it before daylight this morning, so lighting isn’t good):

2013 DMBOM Block 3 Complete


I think this may be my favorite basket block so far that I have made.  Although I have the Sweet Caroline pattern from Fig Tree that I am anxious to start.

My impatience showed itself though with this block.  I was careful in getting everything squared and sized as I went along – until I did the ‘flower’ pieces of the block.  I just got cocky that my 1/4″ was doing fine and went to town.  Here’s a closeup after I trimmed the final block to 12 1/2″ square:

2013 DMBOM Block 3 Closeup

Those points will be cut off when I join this block to others in the quilt.  Not just the points in the picture above, but ALL the flower points will be cut off somewhat.  I’m not happy about it.  And I was really impatient and stupid to trim the blocks down .. KNOWING that it was going to do this.  I just thought I could live with it.  I probably won’t.  I will probably pick these two blocks apart back down to the base basket and repiece the outer patchwork that I prematurely trimmed from scrap and do it again.  Next month maybe.

Block 4 of this series arrived around the 10th of the month and I have it cut out and ready to piece tonight.

No problem with the fabric allowance.  However, the cutting calls for 5 1/4″ squares in many of the fabrics and then they are all cut twice on the diagonal.  Well, … I couldn’t quite get the full 5 1/4″ square on the second set – it would have been off about 1/8″ one one side … so I just adjusted it to cutting out two 3 3/4″ squares and slicing them only once diagonally and I got the same result!

2013 DMBOM Block 4 parts


This block has a lot fewer pieces and a lot fewer steps to put it together than last month.  Does that bother me?  Heck no!!  Nothing wrong with an easy month!

Here are my leftovers after getting two sets of pieces cut out:

2013 DMBOM Block 4 Leftovers


Still lots to put in my scrap basket!  Thanks FQS!

Finally – here are my first three block sets together on my design wall.  Block 4 will be up there soon enough!

2013 DMBOM Blocks 1-3 Group


Thanks for visiting today – see you again soon with Block 4 and then I hope to move on to a little work on my  Robin’s Nest quilt next.  I have a slew of BOMs starting in a month or two from FQS and I need to be ready!!

Take care,

Jennifer

Productive absence

Well, I have been gone awhile from a regular blog post – but that doesn’t mean I haven’t been working.  I’m still trying to adjust to having two school age kids with homework and bedtime/morning routines that are honestly kicking my a@@.  We’re taking it one day at a time, but at this rate – I will be a white haired mental patient by the time they reach high school.  Why does everything have to be a struggle?  Get dressed… struggle.  Eat something … ANYTHING … struggle.  Brush your teeth – forget about it.

Well, I have managed to steal away some precious moments to complete THREE of my quilts and give them away.

#1 – Swoon quilt completed and given to my friend at work.  She loved it!  I am waiting for a picture of her and the new husband with the quilt, but hopefully G rated!

#2 – I free motion quilted my Boho AYOS quilt made with the Lincoln pattern.  It was actually really fun to do the quilting myself.  I just had to temporarily relocate the machine to the cleared dining table so I would have plenty of room to move it around.  I look forward to the next one I can try myself.  I did find that my shoulders kept creeping up to my ears as I stitched away.  Why is that?

Don’t you love my label?  I cut into some of my adorable Briar Rose fat quarter for this snipit:

IMG01090-20130915-0947


IMG01095-20130915-0950

I mostly just did a made up version of a swirly wave shape or something around the border … and in a couple of spots, I made up a dahlia shaped flower.  Other than the border, I just did a stitch in the ditch concentric squares starting with the very center 2″ square and working out from there.

I had browsed ideas in my copy of the book Free-Motion Quilting by Angela Walters … but whatever I could manage to do consistently was what I ended up doing.


IMG01094-20130915-0949

I was running out of time for this quilt, because we were taking it to a reception for the baby on that Saturday.  Therefore I did a machine binding on the front and the back.  You can see the machine stitching on the front in the picture below.  Should hold up well though and it turned out so great after it was washed.

IMG01093-20130915-0949


IMG01092-20130915-0948


IMG01091-20130915-0948


And finally – #3 Quilt – Rally for UCLA

I gave this to my boss today for him to pass along to his son who starts at UCLA this week.  I got Abby from Latimer Lane quilts to do the longarm quilting on it and she turned it around so fast for me!

I got her to do a spiral square shape pantograph, which complemented the straight lines and squares on the quilt front.  Here’s a reminder of what the front of the quilt looked like (before quilting) and a picture of the back which shows the quilt motif.


Rally Top 2

Rally Quilt design

The recipient is pursuing an acting career, so I added the drama masks to the quilt label to emphasize his ambitions.  Just used those Micron pens and some word art that I found online to create the label text and pictures in WORD and then printed it off and traced it with a small light box onto the fabric.

Rally Label 2

So … that should be enough … but I have also completed Block 3 of the FQS Mystery Designer BOM.  I’m starting Block 4 tonight (perhaps).  So, later this week, a show and tell on those blocks!

Enjoy and thanks for waiting around for me!

Jennifer

Walk on down High Street in these shoes!

I am working, working, working on completing THREE quilts this week.  I have about 18 inches of binding left to sew down on the Swoon quilt (and attach a label), my BOHO AYOS quilt to bind and give as a baby gift this Saturday and the Rally quilt to bind and give by Monday at the latest.  Not much else to show, so no repeat pictures of those quilts yet.

There is a NEW collection that I can’t stop thinking and planning about though.  I’m surprising myself lately with my taste in the bright colors like in the BOHO collection.  Now, I’m infatuated with HIGH STREET by Lily Ashbury Designs.  Anyone else??

I am just flustering myself on which pattern to use with it because I love all the colors and the designs of the fabric.  What to do, what to do??  I’ll have to browse some of my latest books by my favorite bloggers to get some good ideas I guess.  Something that showcases large pieces of the fabric would be best for me.

I did think of something this morning however … I have been wanting to make a paper-pieced high heeled shoe block quilt for a co-worker who LOVES high heeled shoes.  I’m thinking that the HIGH STREET collection might be awfully cute as the shoe fabric in those blocks.  She loves colorful shoes also.

I bought this pattern a while back, with this notion in mind.  I did an internet search for High Heel shoe quilt patterns and it came up with a Craftsy site link.  The pattern is only $2.50 and was designed by a lady in Italy and is called:

“Sexy high heel” paper pieced pattern

I’ve seen other applique patterns and I may decide to mix and match different ones to come up with a sampler – like my friends’ shoe closet.

So – that’s what is on my mind today – how about you?

Jennifer

Bundle of JOY!

At least, the kind that I get nowadays.  Although my baby girl did just have her 5th birthday!  So, as part of her gift this year, I had a pretty, pink quilt done for her and it arrived on our doorsteps today!

Nora Sampler bundle


Sorry for the poor lighting, it was raining outside and overcast.  Once I have a nice sunny day and I get the binding on, I’ll take some really great pictures outside.

This was the Fat Quarter Shop Designer Mystery BOM from 2011.  It features Strawberry Fields fabric from Fig Tree Quilts.  I used one of those prints for the backing.  My daughter loves all things pink!  Here are some more pictures:


Nora Sampler 3 Nora Sampler closeup Nora Sampler 1 Nora Sampler 2

Linh, with LiMa Sews, did a beautiful job (AGAIN!) on this quilt.  She did some feather quilting down the long columns and stippling around the flowers.  I haven’t had a chance to really inspect it yet, because I was trying to keep Nora from seeing it.  Want to surprise her with it at her birthday party this weekend!

On other projects… I have machine stitched the binding to the front of my Swoon quilt.  Now I just have to either machine stitch it from the back, or get started with the hand binding.  It is a real pain to maneuver around a king size quilt on a small machine in a corner of a bedroom.  I may try to move my machine to the dining table and see if it goes easier that way.

Swoon binding

I sent my Rally quilt off for quilting as well, and it is already on its way back to me!  I have to get it bound and delivered by the end of next week to that new HS graduate leaving for California.

Finally, I have my two blocks cut out for the August month of the current FQS DM BOM 2013 series.  Another beautiful basket block that I can’t wait to share.  Absolutely no problem getting my two blocks of pieces cut from the one set of fabric this month.  Lots left over too!  Thanks FQS!

Hope all is well with you, lovely reader.  I have been super busy with the beginning of exciting school years for my children (Kindergarten and 1st grade!).  We are now going to two schools for the first time, which hasn’t been too bad.  It’s kind of interesting to see how it is shaping the kids relationship to be more apart and independent.

Blog again soon,

Jennifer

The longest Pep Rally ever!!

My Rah Rah Rally quilt top is done!  Except for one little edging row and a perhaps 2″ containment border in black that is.  And the quilting.  And the binding.  And the label.  #%!#$@#  I’m not even close to done…  It is done enough to show it off.

The quilt pattern was from the book, Sweet Celebrations with Moda Bakeshop Chefs: 35 Projects to Sew from Jelly Rolls, Layer Cakes, Fat Quarters, Charm Squares & More, by Lissa Alexander.

MAN!  That is a looooong title, right?

This particular project was created by Melissa Corry, of Happy Quilting.  She has a great blog and wonderful patterns.  You can click HERE to see my prior post.

But enough of the red tape… Here is my finish for the UCLA inspired Rally quilt:

Rally Top 2


I don’t have a fence high enough to display it the ‘right’ way, so I have it sideways for you.  Or you could turn your head.  Whatever.

Here are the colors from a general internet search for UCLA logos.  I saw all kinds of blue and gold colors, so I tried to pick ones that would be best together.  In hindsight, I could have used a more golden/darker yellow – but I’m good.  Really good.  Ready to start a new project.  I have determined through this process that I am not a big fan of working entirely with solids.  Not my thing – but I know others like it.  Enjoy!

Here’s  a close up of it, showing how I haven’t gotten it all ironed out yet:

Rally CloseUp

And my darling model who is in desperate need of a haircut:

Nora and Rally Quilt

In Melissa’s version, she appliques the team logo onto the quilt front.  I don’t have all that kind of time or patience right at this moment, but since their mascot is a bear – I plan to cut out my quilt label in the shape of a bear paw print and use that on the back to help tie it into the school theme.

I hope the recipient enjoys it.  He leaves for UCLA next month.  I guess he could gift it back to his parents to have at their home to start their collection of collegiate items in support of their only child.  Either way would work for me.

Hope you are having a quilty day!  Thanks for stopping by!

Jennifer

Just add it to my tab…

Now THAT would be dangerous … to be able to run a tab at your favorite online or LQS stores.  I would have to go to work for them to get it paid off, and then live in a perpetual cycle.  Maybe not so bad, but likely would no longer have time to actually quilt anything.

I just can’t force myself to pass up certain patterns and this one has gotten my attention.  I already purchased it from FQS, and I have started collecting different cuts of green fabric for the stems and red/pink fabrics for the berries.  (photos taken from the Fat Quater Shop website)

Do you own this pattern yet?  I see several of them being mentioned in blogs.  I think when I make it, I will throw in one cherry block from the Cherry Pie quilt pattern by Fig Tree Quilts:

I had already started a collection of different reds, just in case I wanted to make a red & white quilt.  But THEN, I found the PERFECT background fabric last night while browsing FQS.  It is a new collection that just got uploaded to their site.  Already have my order in for 4 yards:

Berry Background

This is from the collection “Nice People Nice Things” by Helen Stubbings for Red Rooster Fabrics.  I’m not familiar with her, but I couldn’t pass up this print.

Now, I’m not just buying and hoarding – I do have a close finish.  I just have to attach 5 rows together and I’ll share my next finish (pending the quilting) with you in a day or two.

Cuteness alert!

Sparkle and Rosy

Sparkle and Rosy

Sparkle looks HUGE cuddled next to Rosy.  We are working on a *ahem* skin condition for Rosy that is very treatable.  That’s why she has some hairless spots on her right now.

Thanks for stopping by as always!

Jennifer