Archives

AYOS Update

Beautiful weekend here in Houston.  Sunny, clear days – not hot and not too humid.  Enjoyed every minute with the family.  In between cleaning up the family room and monitoring iPad usage, I was able to get more of my Schnibbles done.  All the blocks for the 9 patch units are done, and the setting triangles are sewn together.  Half of the center portion is connected – will be ready for those pieced borders by the end of the week (or tomorrow if I’m lucky).  Here’s what is on my design wall this morning:

image

This will be the first ‘wall’ quilt I have made just for me and I plan to hang it over my sewing machine to keep me inspired.  I can’t wait to enter it into AYOS parade in a couple of weeks.  It will be the perfect size to practice my free motion quilting again!  It’s not too late for you to join in also!  Just click on my link above and it will take you to Sinta’s blog which explains more details and provides more links to all the participants.

No rehab this week.  Wanted to make sure I had plenty done on the Schnibbles.  My goal for next BOM Rehab is the last block in my Birdie Stitches BOM.  I’ve decided to make it my signature block instead of adding a label to the back.  Then I just have to decide on setting triangles (since I made them to be on point) and get it moved into the finished tops pile!

Hope your weekend went well and your Monday has started off smooth and easy.  Thanks for stopping by!

Jennifer

It’s called “Schnibbling”

I’m so excited to work on my first AYOS Schnibble project.  I received my layer cake of Lario (a new 3 Sisters collection by Moda) on Thursday.  Green Fairy has great online deals quite often (and if you come across them – they also do bids on eBay which can land you even better opportunities), and no shipping charge anymore (eBay purchases do have shipping)!  You should see my collection of green pens (you get one free in your order).  Can you say ‘office supply store’?

Here’s my progress on the first Schnibble of 2013 … Hat Trick by Carrie Nelson of Miss Rosie’s Quilt Company.  For more information on joining AYOS (Another Year of Schnibbles) – just click on the blog button in the right side bar, and it will take you to one of the hostesses of the progam – Ms. Sinta of Pink Pincushion.

I’m having fun pairing up the color options and even doing a little ‘controlled scrappy’ approach to the 9 patch units.  The instructions even suggest to go with the individual 2 inch square construction instead of strip piecing these blocks.  I’m getting great practice at both perfecting my 1/4″ seam allowance and using my seam ripper.  Then I discovered that ‘someone’ had slightly moved my needle position knob on the sewing machine.  That could make a difference – right?

image

A little closeup:

image

And a few complete 9 patches on the design wall, along with my 8 Blogger Girls BOM blocks:

image

Today, the family is getting ready to go out to the Houston Pet Expo this morning and peruse the exhibits and animals up for adoption.  Never been before.  I have my eye on two kittens that will be available for adoption soon, and they will be at the Expo today with their sweet rescue group, … Dori’s Darlings.  It’s been over four years since my last furbaby passed away and I have missed the company of a quiet, cuddle partner.  Let me emphasize quiet.

But – what’s this?  Another project waiting it’s turn?  … more to come…

image

Have a beautiful weekend!  Thanks for stopping by!

Jennifer

Two Birds with Two Blocks

Short and sweet update today.  I have the auditors in the office for our annual reviews.  Lots of paper shuffling and printing, excel spreadsheets, reconciliations, etc…  Fun by all!

It is the beginning of another month, which means another Blogger Girls BOM block has been released!  I finished up the second, alternate layout, block last night so I can both share my results with you and link up to Pink Pincushion’s BOM Rehab (a day late).

Here’s the main layout of Block #4 for Blogger Girls BOM.  That gray ‘background’ is actually my sidewalk.  I am trying to get the best light for these pictures.:

image


Here’s the same pattern for this block, but in an alternate fabric layout.  You will also note that each month I do one in a red/green colorway and one in a red/blue colorway.  Now that I have 8 blocks on my design wall, I can see that they are going to look great together in the end!

image


Here are the two blocks, side by side.  I just love French General reds!:

image


So – knock down Blogger Girl BOM for April and another week of BOM Rehab with the same two blocks!  Efficient.

On the LOST front … I just finished Season 2 last night and watched the first episode of Season 3.  Can you believe what Michael did?  I did NOT see that coming.  I’m on the edge of my office chair now, waiting for my lunch break so I can get in another episode.

Have a fantastic week and thanks for stopping by!

Jennifer

Robin Redone and AYOS

I am having a competition for free time since last week.  My husband and I rented the movie “This is 40” (pretty funny – like the actors in it).  During the movie, the oldest daughter references the series “LOST”.  The first season was 10 years ago.  I never got into it for some reason, and I really didn’t watch more than a few episodes past the first season because … unless you really watch from the beginning … you would be …. lost.

So – I thought for some reason I would start to watch the series through Netflix (awesome service for this kind of thing).  Let’s just say that more than a few hours of what could have been quality quilting time has been spent on this new endeavor.  I am through 28 episodes now out of 120 – so there is an end in sight.  And I can watch during my lunch break at work, because Netflix is everywhere you want to be, as long as you have internet.

So … blah, blah, blah – here is what I have accomplished!  I did the redo of the center circle on my Robin’s Nest from last time.  It is soooo much better and almost every point on my stars is clear and sharp!  Yay!!  I decided to join the stars to the hexagon first, then piece in the connecting triangles.

image

Here’s the ‘block’ completed:

image

I can live with this!

Next step is to finish the 12 blue stars and they go around as well, with connecting triangles in a coordinating blue/cheddar fabric.  I have four of those done already, so I’m on a good start.  Linking up a couple of days late to Sinta’s BOM Rehab for this past Monday.

Even though my plate is pretty full, I really wanted to join in another sew-along type event that is hosted by Sinta (Pink Pincushion) and Sherri (A Quilting Life).  They have started the new season for AYOS (Another Year of Schnibbles).  This is where we make a quilt from one of the patterns designed by Carrie Nelson of Miss Rosies Quilt Company.  This month, the pattern is called Hat Trick and requires less than two charm packs and a wee bit of yardage for the inner border, binding and about a yard for the back.  I ordered my PDF pattern last night from Carrie’s website and as soon as the fabric comes in, I’ll knock this one out!


Hat Trick

And I believe my choice of fabric will be from this new collection by 3 Sisters… Lario!

Lario-Bundle-450


It looks a lot like Oasis that came out a year or two ago, but I have a layer cake on it’s way and I think it will make a splendid Hat Trick quilt!

For more information on participating in the AYOS each month this year, please visit the blogs of Sinta and Sherri.  Great blogs, lots of eye candy, and tons of inspiration!

Finally – I’ll close with a few pictures from our Easter holiday.  The egg hunt of 2013!

image image image

Happy first week of April!

Jennifer

Weekend Finish and starting BOM … again …

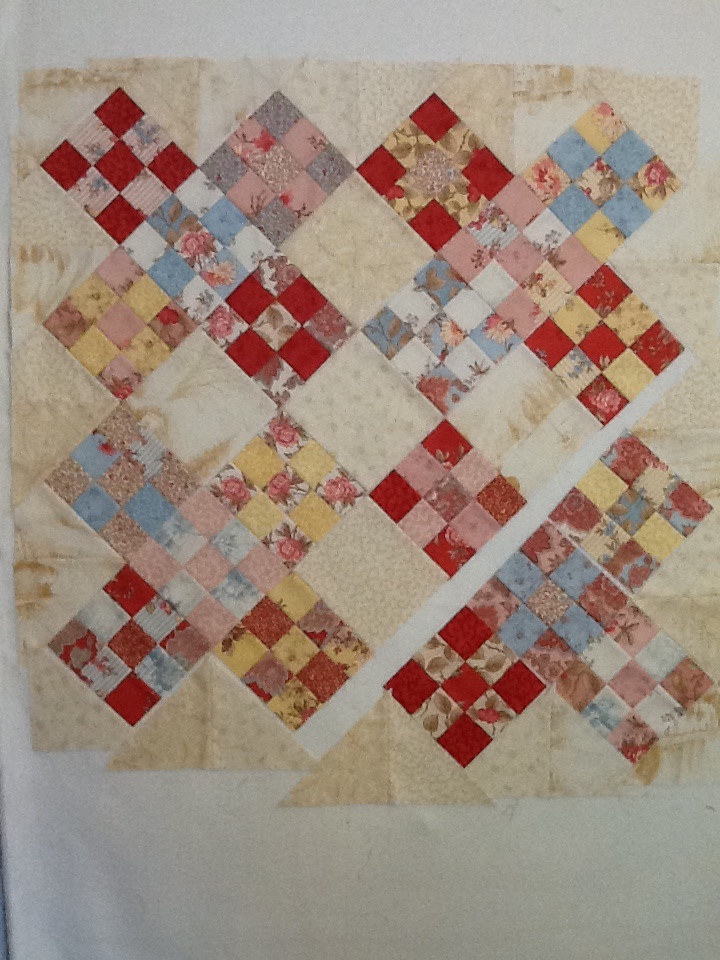
Hello again.  Been gone awhile – but it went by so very fast.  Closed another month of books at work and tried to be ‘in the moment’ with the kids the past two weeks.  Had to get some ‘me’ time in though still.  I have a weekend finish to my Avalon quilt top, although I may still embelish a bit when I go to quilt it.  Waiting on the Avalon yardage to come in (and another paycheck) to get the backing.

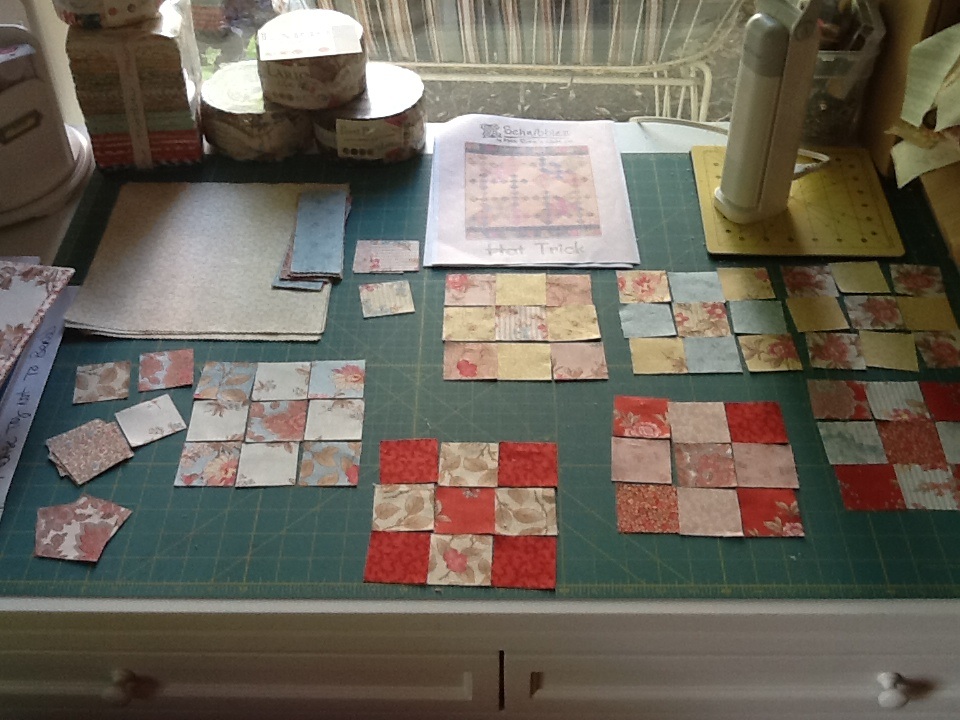
I decided to make excellent use of my California Girl fabric that I bought on extreme sale from my local quilt shop that sold out its bolts last year.  I bought several yards of each of the stripe fabric in three different colorways.  I picked the gray and yellow stripe to complete the border and 9-patch corners.  Very sunny and cheerful!  Turns out that it could now fit a California Twin (if they existed).

image image image image

Borders are my nemesis… and finding any place that I could possibly lay out a quilt to baste it.  I may have to wash down my driveway one day, pitch a tent to keep bird poop off and tape it to the concrete.  I just don’t have that much floor space!  Or… I guess I can bring it to my office and baste it after work one day by T-pinning it to the commercial carpet.  It all feels like dirty options.  Or tape it up on the livingroom wall?  I saw a tutorial one time where someone took newspaper to mask off the surrounding area and spray basted their quilts in the garage on the wall.  Maybe I could try that in the livingroom. 

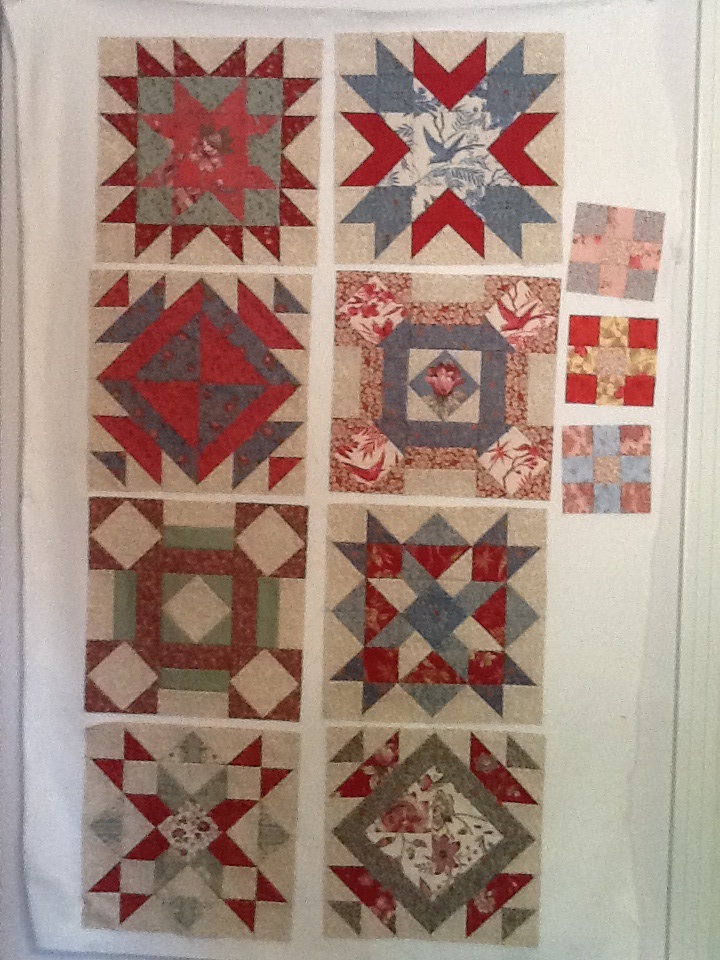
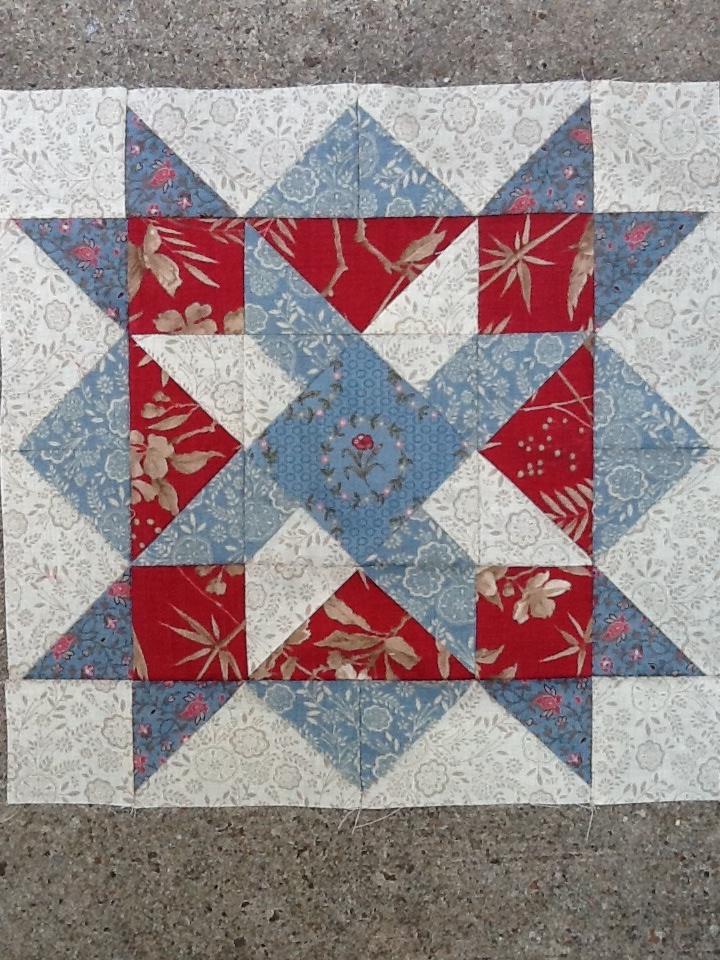
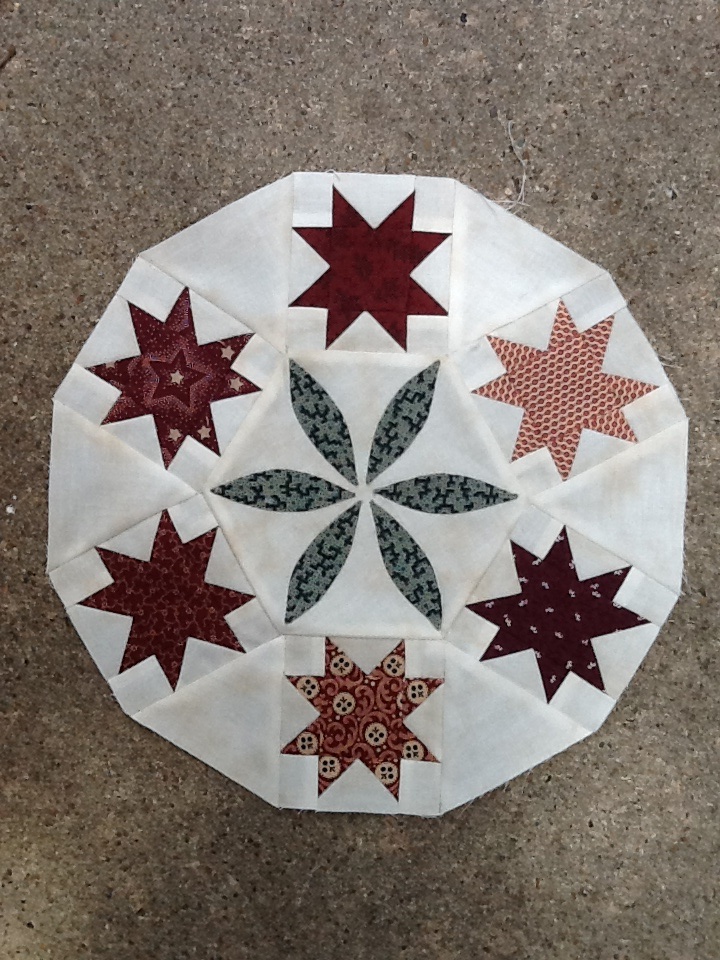
Another psuedo finish for this weekend was my Robin’s Nest BOM.  I did finish the center ring of red stars and stitched it to my appliqued hexagon.  Those star blocks finish at 3 inches!  3 INCHES!  This was going to be a challenge for sure.  I have my mini fit-to-be-geese ruler on order with Monique, but she is waiting for a shipment to come in…  I do have perfect acrylic templates that allow you to cut the shapes exactly as they should be, with squared off corners and all to make it fit.  Surprisingly, I got better results on this project when I made sure I didn’t skimp on the 1/4″ seam allowance.  Those seams seemed so BIG compared to the finished size of these pieces.

 image

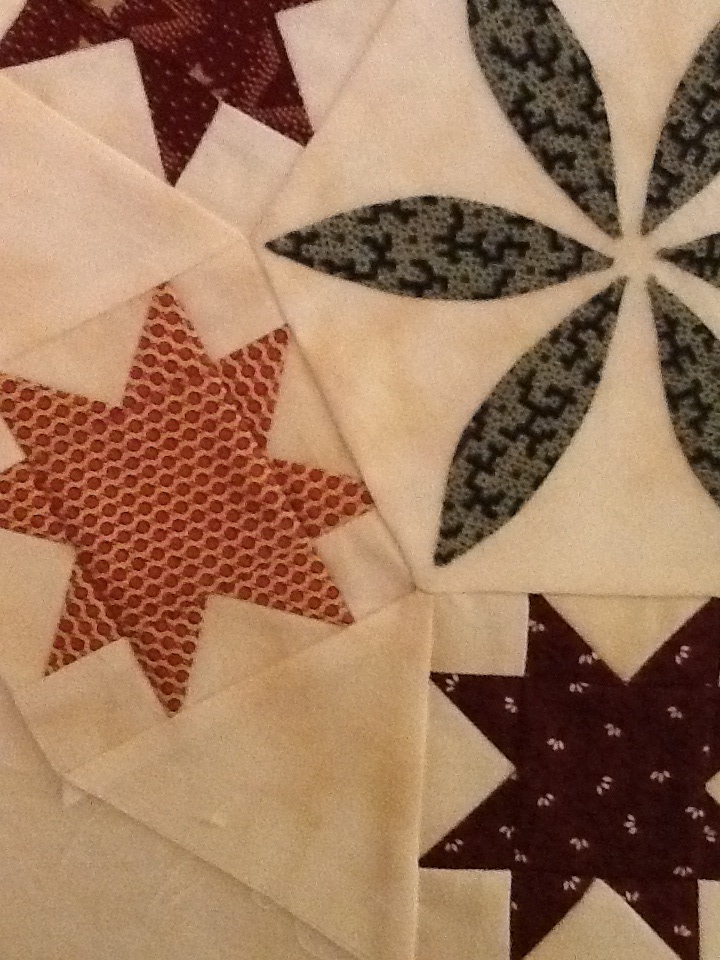
 Look at those pitiful points and pinched connecting triangles!

image

image

I nearly cried when I put it on my wall and stepped away to view it.  It was terrible. !@#$!@#$ 

Calm down, not the end of the world. 

Except that I have someone special in mind for this quilt and I want it to be as perfect and beautiful and I know it could be.  Thankfully, Homestead Hearth provided enough fabric such that I could screw this up at least twice and still make another set that is worth a damn.

So… I ripped out all the stitches and salvaged the center hexagon.  The red stars were too distorted to fool with.


image

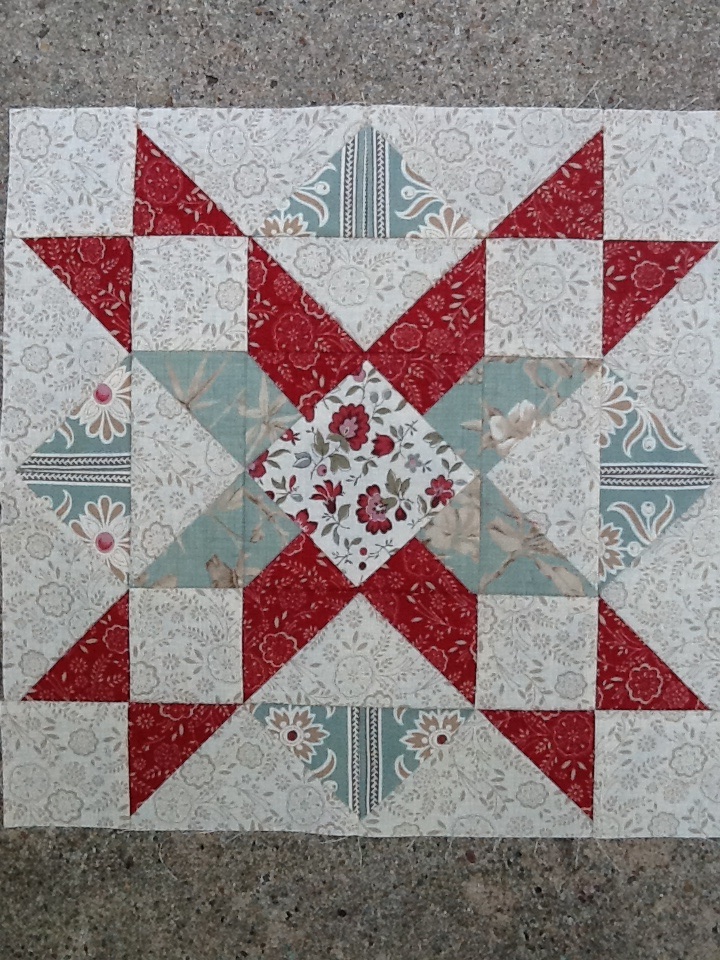
Here is “Take 2” on those stars.  They look better already.  Practice is making better (not perfect yet).  So, 2 stars redone and 4 more to go.  The next ring is 12 blue stars, done the same way.  Hopefully I will be a pro by then.

Therefore, I am still linking up to Sinta’s BOM Rehab since I technically did complete my block – at least once.

Finally – a gratuitous picture of my grandmother and daughter.  I took this last weekend when I was visiting my parents to celebrate my brother’s and my birthday week.

image

Thank you for stopping by today!

Jennifer

Starting new BOM! Border of the Month from Australia!

New BOM – Robin’s Nest

I’m going to count this as a rehab project, even though it is referred to as a border of the month.  Same acronym, so it works for me.  I’m a few months behind and it will definitely take time to do it right.  I’m looking forward to enjoying all the steps and mixing traditional piecing with paper piecing (a first for me) and needle-turn applique.  The project came from Karen Styles in Australia.  Her shop, Somerset Patchwork and Quilting, plays host to some really phenomenal workshops with ladies who know how to stick to a project.  Take a look at her blog and browse her website store for reproduction groups and BOM projects that take your breath away!  I got the pattern and acrylic templates from her shop, but I started the fabric BOM delivery from Homestead Hearth.

Robin's Nest by Karen Styles

Robin’s Nest by Karen Styles


Block 1 is technically the full center ring of stars, triangles and 6 center leaves.  But, as I just mentioned, this one will not be a race to the finish.  So, I count my first block as the center applique hexagon!  Done!

image


The little pencil points at the tips of the leaf shapes are going to be the points of the finished hexagon.  I won’t dare cut this out though, until I have the other part done to make sure it fits like a glove.

Today is also my birthday and I hope to get a really good mix of family, friends and quilting in today! 

Thanks for stopping by!

Jennifer

My instant gratification is almost done!

LOL … for me, instant gratification seems to mean about a month turn-around for a quilt top.  If I get the borders on this weekend, like I plan to, it will have taken just over a month to do this.  I’m very excited about it though, because it will be done in the newest Fig Tree collection which isn’t even out in yardage yet.  I’ll wait for the yardage though to come out for the backing and then I’m trying to decide on whether I hand quilt it or send it off.

Here’s a little impromptu addition I made to the bottom of the quilt last weekend:


image


I thought the little flower blocks needed some baskets to go with them!  I had those half-square triangles left over from my ‘scraps’ when making the flower blocks.  Don’t look too closely though.  I didn’t do any math to figure out the positions.  I just added on strips and cut them down to size to fit the bottom of the quilt.  I did have to break into my Avalon charm pack to get the handle applique, since I didn’t have long bias strips to use instead.

image

Avalon Blue Basket

Avalon Blue Basket

image


I was auditioning the yellow flower fabric from Strawberry Fields for my containment border.  I’ll be sewing that on next.  It goes perfectly!!

Thinking of adding a few applique flowers and vines to complete the look I want.  I’ll lay some out after the borders are on and see what I think.  Stay tuned!

Have a wonderful weekend – see you on the other side for BOM Rehab!

Jennifer

Happy Ever After Princess Pillow Pocket by Riley Blake

Ok … Just for those of you who might decide to buy this adorable panel, even though you can’t really read the instructions clearly enough on the online picture or get a picture of the completed project to go along with the instructions…

Let me just share with you.  The first step says “Cut pillow pocket and pillow base 1/4″ beyond design.”

Let’s stop right there.  Look at those pictures.  What do you call a ‘design’?  Well, for me, challenged in the art of doll making and general sewing, I took that to be the bed and armoire pictures.  So, … I cut around the bed first, leaving a 1/4″ seam allowance. 

NO NO NO NO NO NO

The ‘design’ includes the cute little pink pinstripe area as well.  You are making an actual rectangular pillow with this project.  I thought we would be making little furniture shaped pockets.  NO NO NO NO NO  Once you have screwed it up this far, the rest of the instructions really don’t make sense and you start yelling at the kids to leave you alone for a few !@#$!@#%$ minutes while you try to figure it out, and to stop asking me every 30 seconds when I’m going to be done with it.  Then you start looking for a YouTube video or something that might be a tutorial on this nightmare.

I found a singel picture in internet land that showed the completed project:

They should include this picture with the panel, or give you a website link on the panel to let you get further instructions or a tutorial or something.

So… I will make do with what I have done and adjust.  I can make it work out and my 4 year old daughter insists that I finish it the way I started.  So, it’s all ok for me.  BUT JUST IN CASE YOU BOUGHT THIS PANEL … be forewarned.  Or just accept the fact that I’m not that bright.  Either way.

Since I don’t know how to properly give credit for the picture above, I’ll just share the link to the site that has it:

http://www.hawthornethreads.com/fabric/designer/sandra_workman_designs/happy_ever_after/panel_in_pink

You’re welcome!

Jennifer

BOM Rehab and a new Blogger Girls Block

Happy Monday!

So glad that BOM Rehab coincided with a new release for the Blogger Girls BOM pattern.  The third block in the series was available Friday, and I was done with both versions by Saturday night.  I have even tackled my fear of Flickr and uploaded my pictures into the Blogger Girl’s group for all to see!

This was a neat block…  I didn’t much like how my first one ended up.  Not enough variation in scale of prints I think.  But it will mix in overall, so I’m leaving it.  I love my alternate block setting and fabric selections.  I went with a layout that I saw from Lisa of Stashmaster blog fame.  She highlighted the churn dash design in the center, which I did as well.

Here’s the primary layout:

BG BOM Block 3

BG BOM Block 3

And here’s the alternate layout for the same block pattern:

BG Block 3 Alt

BG Block 3 Alt

I came across some random stash yardage of La Petite Ecole by French General and used the red floral from it to frame the outside square-in-a-square and the churn dash blue fabric.  It mixed in really well.  I’ve pull some other items from that group to consider on the next blocks too.  The rest of the fabric is still from the La Belle Fleur collection that just came out.

Here are all six of my blocks completed:

BG BOM Blocks 1 - 3

BG BOM Blocks 1 – 3

Not bad for a BOM Rehab finish!

Here’s a sneak peak at something else I worked on yesterday.  I’ll reveal it more later this week… 🙂

Avalon Blue Basket

Avalon Blue Basket

Have a wonderful week and thanks for stopping by!

Jennifer

Avalon progress

I have finished the center portion of my Avalon quilt.  Now to trim the edges and decide on borders.  I have partial strips left over from all the prints in the jelly roll.  Thinking of some interesting way to put them to use in the border, while keeping with the flower theme.

Sorry for the poor lighting.  It was still early this morning and it was starting to rain outside, but I couldn’t resist posting today!


Avalon Quilt Center

I had originally intended to leave out the cream colored floral strips from the quilt, because I thought they didn’t have enough contrast with the background.  After I was almost done with the block construction, I started laying out the blocks on the bed for the connecting stage.  I decided to use those three cream strips and make uniform blocks instead and I REALLY like how they turned out.  I am almost willing to say that this is my favorite block in the quilt now:

Avalon Cream Block

So, there are three same-fabric, cream colored blocks scattered in the quilt top.  I’m so glad I did that.

Here’s one more gratuitous picture from the side of my ‘design bed’.

Avalon Quilt Center 2


Hope you are having a great start to the new week!

Jennifer